Archive for: ‘September 2014’

Creating stack panels from the Authoring Tool (and some XML editing)

September 26, 2014 Posted by Anders Asp

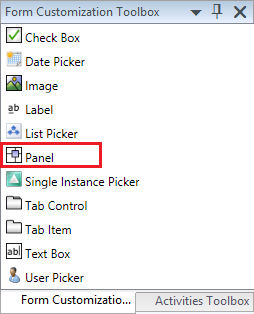
Anyone who’s done some kind of form editing with the Authoring Tool knows that we only have a small number of controls to use when creating our customizations. One particular control that I’ve been missing is the Stack Panel. You know, the container object in which you place other objects and in which the Stack Panel handles the placement for all sub-controls?

As it turns out, you can “create” the Stack Panel without using Visual Studio with a small XML modification.

This is how you would do it:

  1. Open the Authoring Tool and open the form you would like to add the Stack Panel to
  2. Add the control named Panel to the place where you would like to have your Stack Panel. Do not do any other modifications to this control at this time!

    FormCustomizationToolbox
  3. Save the Management Pack and open it in an XML editor (I use Notepad++)
  4. Locate the Panel control (which actually is a Grid) that we added. This should be at the bottom of the <Customization> tag if you didn’t do any other form customizations after you added the control and should like similar to this:

    <AddControl Parent=”StackPanel205″ Assembly=”PresentationFramework, Version=3.0.0.0, Culture=neutral, PublicKeyToken=31bf3856ad364e35″ Type=”System.Windows.Controls.Grid” Left=”0″ Top=”0″ Right=”0″ Bottom=”0″ Row=”0″ Column=”0″ />
  5. To convert the Grid to a Stack Panel, simply change the word Grid in type, to StackPanel. In the example above the code would look like this after the change:

    <AddControl Parent=”StackPanel205″ Assembly=”PresentationFramework, Version=3.0.0.0, Culture=neutral, PublicKeyToken=31bf3856ad364e35″ Type=”System.Windows.Controls.StackPanel” Left=”0″ Top=”0″ Right=”0″ Bottom=”0″ Row=”0″ Column=”0″ />
  6. Save the file and reload (close and open) the MP in your Authoring Tool. The Panel should now be a Stack Panel and you can go ahead and do the rest of your customizations!

Use the Exchange connector for updates only

September 11, 2014 Posted by Anders Asp

The Exchange Connector is an essential part of almost every Service Manager installation. Some customers however, do not want to create new Incidents/Service Requests upon receving new e-mails, but would rather want the connector to handle updates only. This is not possible to configure in the connector itself which causes some people to think that this isn’t possible. But what can we do about this on the Exchange side?

Well, we know that the connector itself will create new work items if incoming e-mails are missing the work item id tag in the subject, such as [IR412] or [SR9122]. If the tag is present in the subject, the connector will update the matching Work Item with the information within the e-mail. So if we can block or reject any e-mails missing the ID tag, the connector would only receive updates, right?

To do this, we would have to create a new rule from the Exchange console. The example below is from my Exchange 2013 lab environment but the same rule is applicable to Office 365 as well.

  1. Open the Exchange Admin Center by using your browser to access https://<servername>/ecp
  2. Log in with an account that has Exchange rights and go to the mail flow tab
  3. Under rules, click the + sign to add a new rule
  4. Select Create a new rule…
  5. Give the rule a name, such as Exchange Connector – accept updates only
  6. Under Apply the rule if… select The Recipient… > address matches any of these text patterns and specify the e-mail address of your Exchange Connector
  7. Under Do the following… select Block the message… > reject the message and include an explanation and enter a message of your choice
  8. Under Except if… select The subject or body… > subject matches these text patterns and specify the text pattern exactly like this: \[\D\D\d*\]
    The text pattern will include any email containing the ID of the Work Item enclosed in square brackets, just like this [IR123]. (The D equals one alphabetic character, and the d equals one numeric character)This is what you should end up with:
    ExchangeRule2

When you’re done in Exchange, try to send some e-mails to your Exchange Connector e-mail address to verify function. Any e-mails missing the id tag should be rejected with a message, and updates should get through and picked up by the connector. When working as it should, implement this into your production environment – because you’re not testing new stuff directly into production, are you? 🙂

Update:

Had a couple of questions on how this could be done in Exchange 2003, see the picture below. Please note that the actual text pattern is a bit different!
Exch2010

Exch2010-2