Posts Tagged: ‘SSP’

Replace self-signed certificate in the Self-Service Portal

February 1, 2013 Posted by Alexander Axberg

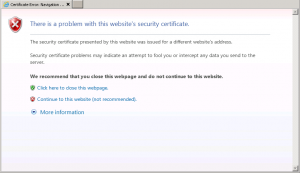
This post will describe how to replace a standard self-signed certificate in the SSP portal with a certificate from a trusted source and correct defined subjectname to get rid of the certificate warnings every time your end-users access the portal.

We don’t want them to see this do we?

Certificate Warning

The first question you need to ask yourself is: What URL should my end-users use?

In this example we will use: https://portal.mycompany.com


The second question is: What computers will access the portal?

In most cases, the portal will only we available for internal use since it requires an AD-user to be logged on.

If it should be accessible from computers outside of the company network, you will need to buy a commercial certificate from an certificate provider that are trusted by most computers (VeriSign, DigiCert for example).

If your company has an internal Certification Authority-server and a PKI-infrastructure already in place, that would probably be the best solution to request a certificate from if only your Company computers will be accessing the portal.

(only the internal computers trust the Company CA-server)


When you are ready, you must begin with creating a certificate request. This request will contain all properties that the certificate will contain.

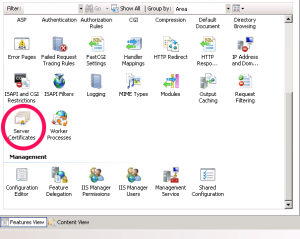
Open IIS Manager on the SSP server.


Select the servername in the left column, and then doubleclick Server Certificates in the right column.

2


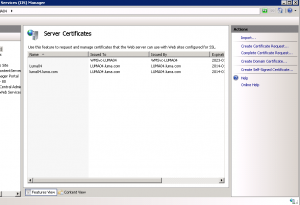
Click Create Certificate Request… The wizard starts.

Server Certificates


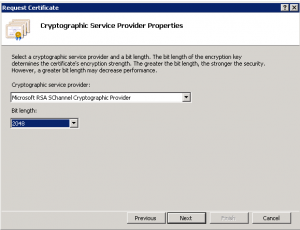
Enter your company information here. The important part is Common Name, as this will reflect the domainname in your URL. If you are planning on buying a commercial certificate, it’s important that the other fields here matches your companys registered information.

Cert details


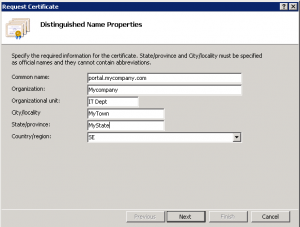
Change the bitlength to 2048 as this is the minimum accepted size many use today.

keysize


Select a location to save your certificate request to a file.

req file


You request is now saved to a file, and in the background a private key has been created on the server that will later be used in the certificate.

Now take that textfile to your certificate authority, they will use the content for producing a certificate. You will then receive a certificate with only a public key from you certificate authority. Take this file and copy it to the SSP server.

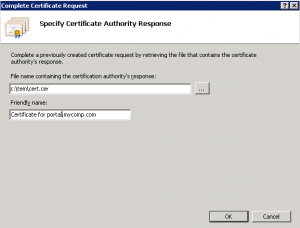
Now go back to your IIS Manger and click Complete Certificate Request…

Select the certificate file you recieved from you certificate authority and enter a friendly name. The friendly name is visible in the “Name” column in IIS Manager.

Click OK.

complete cert req

Now you might recieve an error message, however it’s a false alarm. If you refresh your IIS Manager you will see that the certificate has been added to the list.


Back in the IIS Manager, expand the Sites-container and select Service Manager Portal, and click Bindings.

Bindings


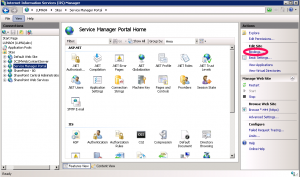
Select the https binding and click edit.

Select the new certificate

Repeat this process the same way for the binding on the site called: SCSMWebContentServer


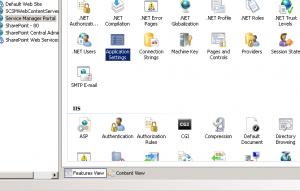
In IIS, double-click on Application Settings for the Service Manager Portal-site.

application_setting

Update the SMPortal_WebContentServer_URL value to reflect the URL in the new certificate.

Click OK, Close


Open the file: C:\inetpub\wwwroot\System Center Service Manager Portal\ContentHost\web.config, and edit the 3rd row from the bottom to reflect your new URL:

<add key=”ContentHostAbsoluteUri” value=”https://SERVER:443/ContentHost” />

Recycle the Application Pool in IIS Manager called: ContentHost_appPool to reload the edited web.config-file

This will prevent you from getting errors when opening Knowledge Articles on the portal.


..and you are all done!


Some extra information if you are curious on the certificate request process:

When the request file is created, at the same time a private key for that upcoming certificate is created. You can see it if you open up mmc.exe, add the Certificate snap-in(Computer Store) and look under the Certificate Enrollment Requests.

private key

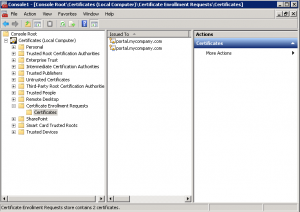
Here is the private key that just been created. They will later be merged together with the public key in the .cer file you recieved when you run the “Complete Certificate Request” process.

Windows stores all it’s private keys for computerbased certificates at: C:\Users\All Users\Microsoft\Crypto\RSA\MachineKeys


Minor SSP modifications, part 4 – Changing status of an incident when updated by the End user

June 12, 2011 Posted by Anders Asp

Part 1 – Preperations: http://www.scsm.se/?p=398
Part 2 – Changing the default urgency of an incident: http://www.scsm.se/?p=421
Part 3 – Changing the preferred contact information behaviour: http://www.scsm.se/?p=459

Disclaimer: I’m not a developer and this is all new to me as well. All code is provided “as is” and I do not give any warranties or take any responsible for any errors that might occur.

One of the new features that the “new” portal provided, was the ability to let end users updated their incidents. That is a really nice feature but wouldn’t it be good to notify the assigned analyst that the end user has updated the incident? To achieve that, we are going to modify the SSP so that when an end user updates his or hers incident, we are changing the status of the incident to “Updated by Affected user”. In that way we could create a regular workflow inside Service Manager to notify the assigned analyst.

  1. To start with, open the Service Manager console and go to Library –> Lists. Locate the Incident Status list and open it.
  2. Mark Active and press Add child. Give the new list item a name, such as “Updated by Affected user”, then press Ok.
  3. Now we need to find out the enumeration value for this list item. To do so, we’re going to export the Management Pack in which it is stored. Go to Administration –> Management Packs and locate the “Service Manager Incident Management Configuration Library” management pack. Export this management pack.
  4. Open the “Service Manager Incident Management Configuration Library” which you just exported and search for whatever you named your new status. In my case “Updated by Affected user”. This should take you to the bottom of the file, to the language section and to something that looks like this:
            <DisplayString ElementID="Enum.b0a54eb92f6a4ee7a2016e3fc154b204">
              <Name>Updated by Affected user</Name>
            </DisplayString>
    

    Copy the ElementID (Enum.b0a54eb92f6a4ee7a2016e3fc154b204), we are going to use it in an SQL query soon.

  5. Go the SQL server where the Service Manager database is stored, open the SQL Server Management Studio, locate the Service Manager database, right click it and select New Query.Run this query, and be sure to replace <ENUM> with the enumeration value we copied in step 4 (in my case “Enum.b0a54eb92f6a4ee7a2016e3fc154b204”).
    SELECT EnumTypeId, EnumTypeName
    FROM dbo.EnumType
    WHERE EnumTypeName = '<ENUM>'
    

    One line should be returned when running the query. Copy the EnumTypeId that is returned (in my case 401F45DE-1745-5AFB-9767-F412FB48835E).

  6. Start Visual Studio and load your SSP project.
  7. Locate and open the Webparts/Request/RequestDetails.cs and search for “Update Request”. Our fourth search should bring you to line 652 and to the code that looks like this:
    // Update request button
    HtmlTableCell r1c1 = Utils.GetTableCell(Constants.grayText, null, 30);
    this.updateRequestButton = new Button();
    this.updateRequestButton.ID = WebpartsConstants.UpdateIncidentButtonId;
    this.updateRequestButton.CommandName = "updateIncident";
    this.updateRequestButton.CommandArgument = "updateIncident";
    this.updateRequestButton.Command += new CommandEventHandler(updateRequestButton_Command);
    this.updateRequestButton.Text = WebPartsResources.UpdateRequestButton;
    this.updateRequestButton.Width = Unit.Pixel(135);
    r1c1.Controls.Add(this.updateRequestButton);
    

    This is where the Update Request button is added to the page. Line 7 (line 568 in VS) is the one that we are interested in, cause that is what is happening when someone presses the button. Click on updateRequestButton_Command to place your marker there, then press F12 to bring you to the definition of updateRequestButton_Command.

  8. This will take you to line 997 in VS and to the code that looks like this (please read the comments in the picture):So click on UpdateIncidentInternal to place your marker then, then press F12 to go to the definition.
  9. This will bring you to the Helper.cs file and to the code that looks like this (please read the comments in the picture):So the first step is pretty easy. We would just have to replace the ManagementPackReferences.INCIDENTSTATUSENUM_ACTIVE_REFERENCE) with the GUID we got from the SQL query we ran in Step 5. I chosed to do it a little fancier though:
    if (isResolved)
    {
        // Add the Action Log Object
        IDataItem updateActionLogItem = (IDataItem)sdkQueryUtility.CreateEmoFromClass(WebpartsConstants.ActionLogTypeId);
        //If it is resolved then reactivate it by changing the status to Active...
    
        // Edited by Anders Asp - www.scsm.se. (Part 4)
        //IDataItem activeStatusEnumeration = sdkQueryUtility.GetEnumeration(new Guid(ManagementPackReferences.INCIDENTSTATUSENUM_ACTIVE_REFERENCE));
        IDataItem customStatusEnumeration = sdkQueryUtility.GetEnumeration(new Guid("401F45DE-1745-5AFB-9767-F412FB48835E"));
                   
        //requestDataItem[WebpartsConstants.IncidentPropertyStatus] = activeStatusEnumeration;
        requestDataItem[WebpartsConstants.IncidentPropertyStatus] = customStatusEnumeration;
        //End
    
        //...and creating an action log entry based on the Reopened enum
        IDataItem updateEnumeration = sdkQueryUtility.GetEnumeration(WebpartsConstants.ActionLogRecordReopenedEnumId);
        updateActionLogItem[WebpartsConstants.ActionLogPropActionType] = updateEnumeration;
        updateActionLogItem[WebpartsConstants.ActionLogPropTitle] = updateEnumeration[DataItemConstants.DisplayName];
        updateActionLogItem[WebpartsConstants.EnteredDate] = DateTime.Now;
        updateActionLogItem[WebpartsConstants.ActionLogPropDescription] = strLogComment;
        updateActionLogItem[DataItemConstants.Id] = Guid.NewGuid().ToString();
        updateActionLogItem[WebpartsConstants.EnteredBy] = HttpContext.Current.User.Identity.Name;
    
        requestDataItem[WebpartsConstants.ActionLogComponentName] = updateActionLogItem;
    }
    

    If we would build and deploy this to the SSP now, all resolved incidents that our end users comments, would get the status “Updated by Affected user”. But we want to make this happen on all types of incidents, regarding their previous status.

  10. To do this, we will have to add the two lines of code from above, to the second part of the if statement. Like this:
    //Since it is not currently resolved just add an end user comment
    IDataItem updateCommentLogItem = (IDataItem)sdkQueryUtility.CreateEmoFromClass(WebpartsConstants.CommentLogTypeId);
    updateCommentLogItem[DataItemConstants.Id] = Guid.NewGuid().ToString();
    updateCommentLogItem[WebpartsConstants.EnteredDate] = DateTime.Now;
    updateCommentLogItem[WebpartsConstants.EnteredBy] = HttpContext.Current.User.Identity.Name;
    updateCommentLogItem[WebpartsConstants.CommentLogComment] = strLogComment;
    // Added by Anders Asp - www.scsm.se. (Part 4)
    IDataItem customStatusEnumeration = sdkQueryUtility.GetEnumeration(new Guid("401F45DE-1745-5AFB-9767-F412FB48835E"));
    requestDataItem[WebpartsConstants.IncidentPropertyStatus] = customStatusEnumeration;
    // End
    

    And here’s a picture how it looks in Visual Studio:

  11. And with that change, we are all done. Build and copy the modified DLL files to the SSP server. As soon as someone updates an incident from the Self-service Portal, the status of that incident will change to “Updated by Affected user”.

If you would like assigned analyst to get notified when the end user has updated an incident, you should be able to do so with a regular workflow within Service Manager. Just use the critera
Incident status changed from NOT EQUAL “Updated by Affected user”
Incident status changed to EQUAL “Updated by Affected user”

You should also consider applying a template that changes the incident status back to Active when this workflow is triggered, otherwise you might miss notifications if an end user does comment the incident several times.

Minor SSP modifications, part 3 – Changing the preferred contact information behaviour

June 9, 2011 Posted by Anders Asp

Part 1 – Preperations: http://www.scsm.se/?p=398
Part 2 – Changing the default urgency of an incident: http://www.scsm.se/?p=421

Disclaimer: I’m not a developer and this is all new to me as well. All code is provided “as is” and I do not give any warranties or take any responsible for any errors that might occur.

 –

It’s almost exactly a month since my last post, and the reason for that is that I once again became a father of a little girl 🙂

But let’s put that aside for a moment, and let’s go on customizing the Self-service Portal.

Today we’re going to focus on the behaviour of the “Preferred contact information” step when creating a new Incident or Change Request. By default, it looks like this:

And as you can see, even though Service Manager doesn’t have any information stored regarding my e-mail address or phone number, I can still chose to be contacted that way. The worst part is that even though the information is unavailable, it is still selected by default. We don’t want any end-user to register a new IR/CR if we don’t have any means in contacting them.

We are going to change the behaviour of this control, so if the information regarding the end-users e-mail address or phone number is unavailable, we will disable that radio button.

  1. Fire up Visual Studio and load your project.
  2. Open the CreateRequest.cs file that is located in WebParts/Request. This is the file in which almost all logic regarding the create request wizard is stored.
  3. So how are we going to find the correct lines of code to edit in this huge file? Let’s try searching for “contact” and see if we can find anything interesting…

    Our first hit should be the definition of a TextBox named alternateContactMethod. Doesn’t that sounds familiar? 🙂

    private TextBox alternateContactMethodTextBox;

    So let’s search again, but this time search for “alternateContactMethodTextBox”. This search will take you to a snippet of code that looks like this:

    HtmlTableCell r3c3 = new HtmlTableCell();
    r3c3.Attributes.Add("class", Constants.grayText);
    alternateContactMethodTextBox = new TextBox();
    alternateContactMethodTextBox.ID = "txtBoxAlternate";
    alternateContactMethodTextBox.CssClass = Constants.grayText;
    r3c3.Controls.Add(alternateContactMethodTextBox);

    And this is where the Alternate contact method textbox is added to the page. If you scroll a bit upwards, you should see a couple of comments saying something about Getting phone and Getting e-mail address. Great! We’ve found the place in the code where the preferred contact information is defined. (Line 1472 in Visual studio)

  4. So let’s take a look at the e-mail part:
    HtmlTableRow r1 = new HtmlTableRow();
    HtmlTableCell r1c1 = GetHeaderCell(20);
    rbEmail = new RadioButton();
    rbEmail.Text = WebPartsResources.Email;
    rbEmail.GroupName = "ContactMethod";
    rbEmail.Checked = true;
    r1c1.Controls.Add(rbEmail);
    
    HtmlTableCell r1c2 = Utils.GetLeftSpaceCell(Constants.NonBlockingSpace, LeftMargin);
    
    HtmlTableCell r1c3 = new HtmlTableCell();
    r1c3.Attributes.Add("class", Constants.grayText);
    lblEmailAddress = new Label();
    lblEmailAddress.ID = "lblEmailAddress";
    lblEmailAddress.CssClass = Constants.grayText;
    
    // get the current users's email address from one of its Notification endpoints
    lblEmailAddress.Text = GetEmailAddress();
    
    r1c3.Controls.Add(lblEmailAddress);
    

    Let’s take a closer look at some lines of the code:
    Line 3-6 is the definition of the radiobutton for the e-mail contact method. On line 6 this method is defined as checked = true, which means that this is the default value.
    Line 7 is the line of code that adds this control to the page itself.
    Line 13-15 is the lines of code where the label for the e-mail address is defined.
    Line 18. The text of the label itself is retrived from a function called GetEmailAddress.
    Line 20. The label is added to the page.With this knowledge, we are able to figure out that if the function GetEmailAddress on line 18 is returning “Not available” we should change the properties of rbEmail which is the radio button.

  5. Time to do some coding 🙂

    We need to add an if statement to check the value of lblEmailAddress, and if that value equals “Not available” we want to disable the radio button. Enter the following code on line 1504 in Visual Studio:

    if (lblEmailAddress.Text == WebPartsResources.NotAvailable)
    {
        rbEmail.Enabled = false;
        rbEmail.Checked = false;
    }
    

    So if we would build this and deploy it to the SSP, it would now look like this:That’s a great start, isn’t it? 🙂

    Just a couple of notes regarding the code we added before continuing:
    Instead of comparing lblEmailAddress.Text to the string “Not available”, I chosed to compare it to WebPartsResources.NotAvailable. The reason for that is if we are running the portal in a different language, or if someone decides that we want to use another verbiage instead, our code wouldn’t work. If we use WebPartsResources.NotAvailable we don’t have to worry for those things.

    Here’s how it looks in Visual Studio:

  6. Let’s go on and do the same with phone. First add this code to line 1523 in Visual Studio:
    if (rbEmail.Checked == false)
    {
        rbPhone.Checked = true;
    }
    

    This code will check the radio button for Phone if we unchecked rbEmail.

    Then go to line 1545 and add this code:

    rbPhone.Enabled = false;
    rbPhone.Checked = false;
    

    This is how it should look in Visual Studio now:
    If we would build and deploy this to the SSP, it would now look like this:Go to line 1566 and add this code:

    if (rbPhone.Checked == false && rbEmail.Checked == false)
    {
        rbAlternate.Checked = true;
    }
    

    This is the code that will set the Alternate radio button to checked, if the other radio buttons is unchecked.

    
  7. As a final step we want to make sure that if our end-users doesn’t have an available e-mail address or phone number, they are forced to enter something in the alternate contact method textbox. To do so, enter the following code on line 1591:
    if (rbPhone.Checked == false && rbEmail.Checked == false)
    {
        HtmlTableRow r3b = new HtmlTableRow();
        HtmlTableCell r3bc1 = GetHeaderCell(20);
        HtmlTableCell r3bc2 = Utils.GetLeftSpaceCell(Constants.NonBlockingSpace, LeftMargin);
    
        HtmlTableCell r3bc3 = Utils.GetTableCell(Constants.ValidationClass, null, null);
        RequiredFieldValidator reqFieldValidatorAlt = new RequiredFieldValidator();
        reqFieldValidatorAlt.ControlToValidate = "txtBoxAlternate";
        reqFieldValidatorAlt.CssClass = Constants.ValidationClass;
        reqFieldValidatorAlt.Text = "Please enter an alternate contact method";
        r3bc3.Controls.Add(reqFieldValidatorAlt);    r3.Cells.Add(r3bc1);
        r3.Cells.Add(r3bc2);
        r3.Cells.Add(r3bc3);
                   
        table.Rows.Add(r3b);
    }


    So where did I get this code? Well, I knew there was a similar function for the title field on the next step of the wizard, so I did some searches in the source code for that and found these lines of code. Then I just modified some of them to fit the alternate textbox instead.

    Here’s how it looks like in Visual Studio:


    When an end-user tries to go on to the next step without entering an alternate contact method, they will get a warning like this:

    So now when we’ve done that we should be finished for now. Build your solution and copy the DLL files to the SSP server and try it out. (See part 2 of the series for more details on how to do this)

Any comments regarding this post is highly appriciated! 🙂

Note: The function of validating that something has been entered into the Alternate text box will only work if the user doesn’t have any E-mail address or Phone available. What we really want, is that as soon as someone checks the radio button for alternate (or clicks in the textbox), we want to enable this validation. I’ll try to figure out how to solve this post an update if I do. Tips on how to trigger a postback is appriciated!

Minor SSP modifications, part 2 – Changing the default urgency of an incident

May 8, 2011 Posted by Anders Asp

Part 1 – Preperations: http://www.scsm.se/?p=398

Disclaimer: I’m not a developer and this is all new to me as well. All code is provided “as is” and I do not give any warranties or take any responsible for any errors that might occur.

So in this post we’re going to do our first modifications to the SSP, and the goal of todays post will be to change the default value of the urgency dropdown to Low (the defualt out-of-the-box value is Medium).

  1. Start Visual Studio and open the Portal.sln that was extracted from the PortalSource-New.zip in step 5 in Part 1 of the series.
  2. Next we need to locate the file in which the code related to this dropdown is stored. With the help of the documentation that was bundled with the source code (System Center Service Manager 2010 Custom Portal Development.docx), I managed to figure out that it is stored in the file named CreateRequest.cs.
  3. So browse the Solution Explorer on your right hand side of Visual Studio for CreateRequest.cs. It should be located at WebParts/Request/CreateRequest.cs. When you found the file, double click it to open it up.
  4. Most of the code related to the “Create Other Request” wizard is located in this file. Unfortunately there is more than 2600 lines of code in this file, so what should we do to find the part regarding the urgency dropdown? Let’s start with searching for the word “Urgency” (Hit Ctrl+F to open up the search window). Our first search should bring you to a line of code that says:
    private Label urgencyHeaderLabel;

    This is the declaration of a variable that seems to be the label of the Urgency part of the wizard. But what’s more interesting, is the line below:

    private DropDownList urgencyDropDownList;

    Great! Now we found the declaration of what looks like the dropdown menu of Urgency. Now let’s continue to search, but this time search for “urgencyDropDownList” instead.Our first hit of  “urgencyDropDownList” is actually where the control itself is added to the wizard. But there’s no hints regarding the default value…It turns out, that there’s plenty of code regarding the urgencyDropDownList, but continue to search until you hit line 2213 (current line is showed in the bottom right hand corner in the status bar, displayed as “Ln”).

    Now that’s a great hint! Thanks for putting those comments in the code Microsoft! 🙂

  5. Take a look at the picture below. I’ve tried to explain the code within the picture. However, the key part of this modification, is to change the part of the code that says:
    if ((Guid)item[DataItemConstants.Id] == Constants.TroubleTicketUrgencyMediumId)

    Unfortunately,we can’t just replace the Constants.TroubleTicketUrgencyMediumId with Constants.TroubleTicketUrgencyLowId. We need to define Constants.TroubleTicketUrgencyLowId first.

  6. So where and how should we declare this constant? Let’s take a look at how Microsoft have declared TroubleTicketUrgencyMediumId. To do so, click the word “TroubleTicketUrgencyMediumId” once to put your marker on it, then press F12 which will bring you to the definition of this variable.That should take you to the Constants.cs file and to a line that looks like this:
    public static readonly Guid TroubleTicketUrgencyMediumId = new Guid(ManagementPackReferences.SYSTEM_WORKITEM_TROUBLETICKET_URGENCYENUM_MEDIUM_REFERENCE);


    So the declaration of TroubleTicketUrgencyMediumId is done here, but is referenced to another constant? Click SYSTEM_WORKITEM_TROUBLETICKET_URGENCYENUM_MEDIUM_REFERENCE to put your marker there, and press F12 to go to the definition…

    public const string SYSTEM_WORKITEM_TROUBLETICKET_URGENCYENUM_HIGH_REFERENCE = "2F8F0747-B6CB-7996-FD4A-84D09743F218";
    public const string SYSTEM_WORKITEM_TROUBLETICKET_URGENCYENUM_LOW_REFERENCE = "725A4CAD-088C-4F55-A845-000DB8872E01";
    public const string SYSTEM_WORKITEM_TROUBLETICKET_URGENCYENUM_MEDIUM_REFERENCE = "02625C30-08C6-4181-B2ED-222FA473280E";

    Aha. In the ManagementPackReferences.cs within the Microsoft.Mom.BuildConstants.dll, the Out-of-the-box GUIDs for the different levels of urgency is stored.

  7. With this knowledge, let’s get back to the Constants.cs file, and add a new constant for Low urgency. Add a new line undernethe line 55, and enter:
    public static readonly Guid TroubleTicketUrgencyLowId = new Guid(ManagementPackReferences.SYSTEM_WORKITEM_TROUBLETICKET_URGENCYENUM_LOW_REFERENCE);


  8. Now get back to the CreateRequest.cs file and change Constants.TroubleTicketUrgencyMediumId to Constants.TroubleTicketUrgencyLowId on line 2225. This will work because we have defined a value for TroubleTicketUrgencyLowId in the constants.cs file now.
  9. That should be all coding required for this change. So press F6 to build your solution, and make sure that you get Build Succeeded in the lower left hand corner of the screen.
  10. Head to the directory in which the project is stored, and locate the ..\End User Portal\bin folder. In that folder, find and copy all .DLL files that was updated when you built your solution.
  11. Now head to the SCMS SSP server, and paste those .DLL files in the C:\inetpub\wwwroot\System Center Service Manager Portal\Customized_EndUser\Bin directory. You will get prompted with a question asking if you would like to overwrite the current .DLLs, answer Yes.
  12. Open Internet Explorer and browse to your Customized_EndUser. Click the “Create Other Request” button followed by Next. Step 2 of the wizard should now be displayed, and so should the Urgency dropdown. The default value should now be set to Low.
  13. And that’s it! We are done for today 🙂

I’d love any comments regarding this. Is these types of articles helpful? Are they too easy? Too hard? Are there any kind of minor modifications you would like me to post about?


Minor SSP modifications, part 1 – Preperations

May 7, 2011 Posted by Anders Asp

The source code for the Self-service Portal (SSP) has been released for a while and along with the code you got the option to use an upgraded version of the portal. This upgraded version includes a completly new look, a couple of bug fixes and some new features.

Official blogpost regarding the SSP source code can be found here:
http://blogs.technet.com/b/servicemanager/archive/2011/03/02/service-manager-portal-source-code-released.aspx

That is all great, but there might still be some minor things that you want to change with the portal, and that’s why I’m starting this series of blogposts regarding minor modifications of the SSP. Before we start, I just want to add a disclaimer: I’m not a developer and this is all new to me. All code is provided “as is” and I do not give any warranties or take any responsible for any errors that might occur.

Before I start this series of blogposts “for real”, we need to make sure that you have made any preperations required to follow the serie.

1. Install Visual Studio (I will be using Visual Studio 2010 in this serie)
2. Download the SSP source code and extract the files (http://www.microsoft.com/downloads/en/details.aspx?FamilyID=65fbe0a3-1928-469f-b941-146d27aa6bac&displaylang=en)
3. Since we will be working with the upgraded version of the portal, we need to deploy it into our test/lab/development environment.
3.1. Locate the zip-file containing the updated SSP (..\SCSM2010SP1PORTALSOURCERELEASE\NewExamplePortal.zip) and extract the files.
3.2 Browse the extracted files and rename the EndUser folder to Customized_EndUser and Analyst to Customized_Analyst.
3.3 Copy Customized_EndUser and Customized_Analyst to %systemDrive%\inetpub\wwwroot\System Center Service Manager Portal\ on your SSP server in your test/lab/development environment.

Copy files to SSP

3.4 Open IIS Manager and locate the SCSMPortal. Now, right click the Customized_EndUser folder and choose Convert to application. Repeat for the Customized_Analyst folder.

Convert to application

4. Open Internet Explorer and browse https://<SERVERNAME>/customized_enduser. If everything was done correctly, the updated SSP should now be displayed.

Updated SSP

5. Locate the zip-file containing the source code for the new portal, and extract it (..\SCSM2010SP1PORTALSOURCERELEASE\SourceCode\New\PortalSource-New.zip)
6. Copy the reference binaries listed below from %systemDrive%\inetpub\wwwroot\System Center Service Manager Portal\EndUser\bin\on the SSP server into the ..\SCSM2010SP1PORTALSOURCERELEASE\SourceCode\New\PortalSource-New\Common folder in the Visual Studio solution.  These assemblies can then be used to resolve the VS project assembly references.
– Microsoft.EnterpriseManagement.Config.dll
– Microsoft.EnterpriseManagement.UI.Foundation.dll
– Microsoft.EnterpriseManagement.UI.SdkDataAccess.dll
– Microsoft.Mom.BuildConstants.dll
– Microsoft.EnterpriseManagement.DataAccessService.Core.dll
– Microsoft.EnterpriseManagement.ServiceManager.dll
– Microsoft.EnterpriseManagement.ServiceManager.Portal.Common.dll
7. StartVisual Studio and open the project for the updated SSP. This file should be named Portal.sln and was extracted in step 5.

Visual Studio

7.1 On the right hand side in Visual Studio, you should have something called the Solution Explorer. This is where all the files related to this project is displayed. Some of these files need to be re-loaded and is therefore marked with a yellow exclamation mark. (All of these files should be in the different Reference folders in the Solution Explorer)

Exclamation mark

7.2 Note the name of the file with an exclamation mark, remove it from the project, and add it again. We copied all these files in step 6, so you should be able to find all the files needed on this path: ..\SCSM2010SP1PORTALSOURCERELEASE\SourceCode\New\PortalSource-New\Common. Repeat this step for all files with an exclamation mark.
(Take a look at the screenshot)

Add reference

8. When you’ve finished replacing all the broken references, we are actually finished with all the preparations. But as a final step, lets build our solution to make sure we won’t get any errors before we even got started with the modifications!
8.1 Build your solution by pressing F6 or by clicking Build Solution under Build in the main menu.
8.2 Make sure that “Build succeeded” is displayed in the status bar on the bottom of the left hand side of the screen.

Build

And that’s it. We’ve installed Visual Studio, “installed” the updated SSP and corrected the broken references in the Visual Studio project. We are now ready to begin editing some code!