Category: ‘Service Manager’

Use the Exchange connector for updates only

September 11, 2014 Posted by Anders Asp

The Exchange Connector is an essential part of almost every Service Manager installation. Some customers however, do not want to create new Incidents/Service Requests upon receving new e-mails, but would rather want the connector to handle updates only. This is not possible to configure in the connector itself which causes some people to think that this isn’t possible. But what can we do about this on the Exchange side?

Well, we know that the connector itself will create new work items if incoming e-mails are missing the work item id tag in the subject, such as [IR412] or [SR9122]. If the tag is present in the subject, the connector will update the matching Work Item with the information within the e-mail. So if we can block or reject any e-mails missing the ID tag, the connector would only receive updates, right?

To do this, we would have to create a new rule from the Exchange console. The example below is from my Exchange 2013 lab environment but the same rule is applicable to Office 365 as well.

  1. Open the Exchange Admin Center by using your browser to access https://<servername>/ecp
  2. Log in with an account that has Exchange rights and go to the mail flow tab
  3. Under rules, click the + sign to add a new rule
  4. Select Create a new rule…
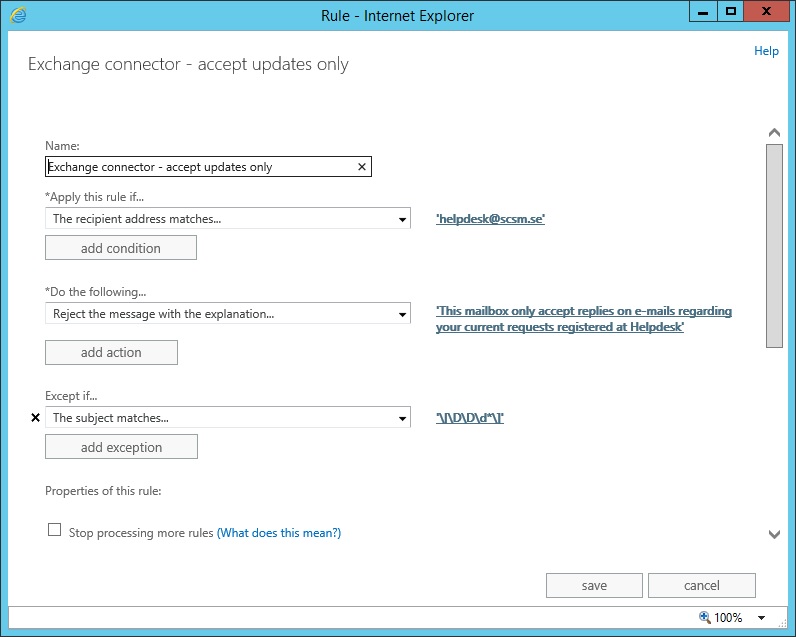
  5. Give the rule a name, such as Exchange Connector – accept updates only
  6. Under Apply the rule if… select The Recipient… > address matches any of these text patterns and specify the e-mail address of your Exchange Connector
  7. Under Do the following… select Block the message… > reject the message and include an explanation and enter a message of your choice
  8. Under Except if… select The subject or body… > subject matches these text patterns and specify the text pattern exactly like this: \[\D\D\d*\]
    The text pattern will include any email containing the ID of the Work Item enclosed in square brackets, just like this [IR123]. (The D equals one alphabetic character, and the d equals one numeric character)This is what you should end up with:
    ExchangeRule2

When you’re done in Exchange, try to send some e-mails to your Exchange Connector e-mail address to verify function. Any e-mails missing the id tag should be rejected with a message, and updates should get through and picked up by the connector. When working as it should, implement this into your production environment – because you’re not testing new stuff directly into production, are you? 🙂

Update:

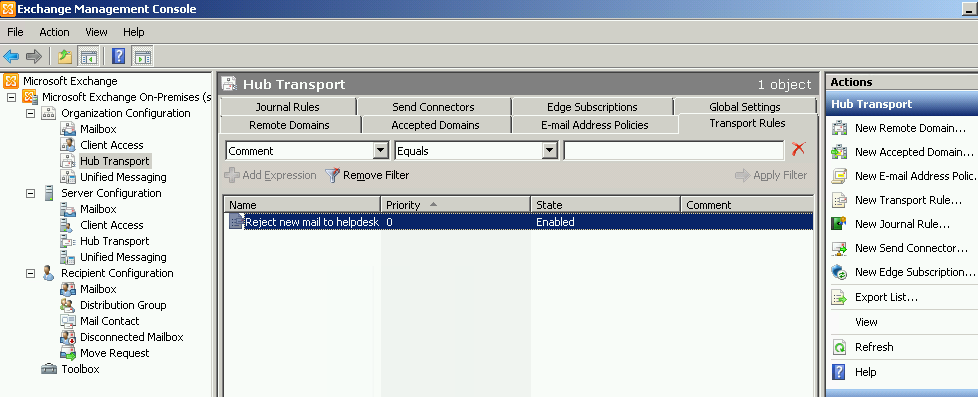
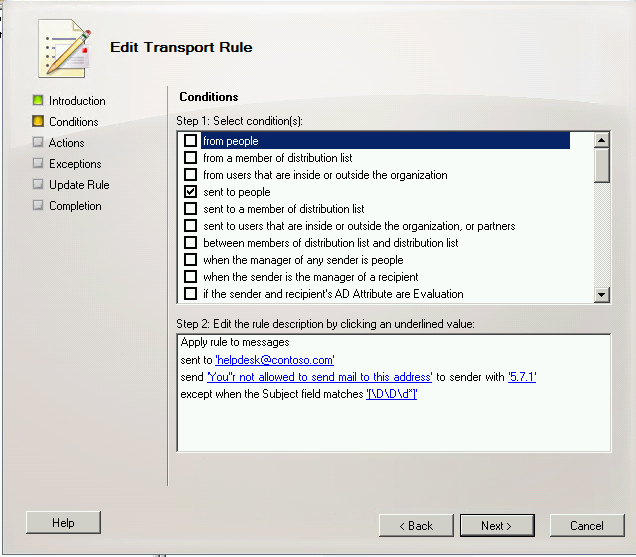
Had a couple of questions on how this could be done in Exchange 2003, see the picture below. Please note that the actual text pattern is a bit different!
Exch2010

Exch2010-2

How to add mail addresses to Data Warehouse

June 25, 2014 Posted by Alexander Axberg

In this post I will go through how to add your users mailaddresses to the Data Warehouse, to be able to display them i reports.
Since they are not transferred to the Data Warehouse by default, we have to build a new Data Warehouse Management Pack to be able to sync this information.

But first a quick look how the mailaddresses are stored.
They are not simply stored in a textstring directly on the user object as you might think. They are actually stored as a separate object in the class “System.Notification.Endpoint”. This is makes it able to create several addresses on the same user (SIP and SMTP).
A relation between this object and the user object is then created. The relation is called System.UserHasPreference.

So what we need to do is to define a dimension for the System.Notification.Endpoint, and include the attributes that store the actual mailaddress.
Then we also need a Relationship Fact between the Notification Endpoint dimension and the User dimension.

The code to create that looks like this:

  <Warehouse>
    <Dimensions>
      <Dimension ID="SubscriberAddressDim" Accessibility="Public" InferredDimension="true" Target="Notifications!System.Notification.Endpoint" HierarchySupport="Exact" Reconcile="true">
        <InclusionAttribute ID="TargetAddress" PropertyPath="$Context/Property&#91;Type='Notifications!System.Notification.Endpoint'&#93;/TargetAddress$" SlowlyChangingAttribute="false" />
        <InclusionAttribute ID="ChannelName" PropertyPath="$Context/Property&#91;Type='Notifications!System.Notification.Endpoint'&#93;/ChannelName$" SlowlyChangingAttribute="false" />
        <InclusionAttribute ID="Id" PropertyPath="$Context/Property&#91;Type='Notifications!System.Notification.Endpoint'&#93;/Id$" SlowlyChangingAttribute="false" />
      </Dimension>
    </Dimensions>
    <Facts>
      <RelationshipFact ID="HasPreferenceFact" Accessibility="Public" Domain="DWBase!Domain.ConfigurationManagement" TimeGrain="Daily" SourceType="System!System.Domain.User" SourceDimension="DWBase!UserDim">
        <Relationships RelationshipType="SupportingItem!System.UserHasPreference" TargetDimension="SubscriberAddressDim" />
      </RelationshipFact>
    </Facts>
  </Warehouse>

So the complete steps to create our new Data Warehouse MP looks like this:

  • Create a new MP with the code above, or download the complete one below
  • Seal it, and import it into Service Manager as usual
  • Wait for the MPSyncjob in Data Warehouse to kick in (every hour) or start it manually. The MP will then be synced into DW.
  • Take a beer while you wait for the deployment in Data Warehouse.
  • When deployment is completed, log into the DWDataMart database in SQL, and look under views and you should have 2 new views there: SubscriberAddressDimvw, HasPreferenceFactvw
  • Now you are all set to start query the database in Reports to display the mailaddresses. You can use the following SQL query to list all your user object in DW with the columns: Username, Domain, Mailaddress

    Take in mind that after the Management Pack deployment is completed, it could take a while to populate the tables with the mail addresses.

    SELECT
    Username,
    Domain,
    smtp.TargetAddress AS 'E-Mail'
    FROM
    UserDimvw AS u
    INNER JOIN HasPreferenceFactvw AS hp
    ON u.UserDimKey = hp.UserDimKey
    INNER JOIN SubscriberAddressDimvw AS smtp
    ON hp.UserHasPreference_SubscriberAddressDimKey = smtp.SubscriberAddressDimKey
    WHERE
    smtp.ChannelName = 'SMTP'
    AND hp.DeletedDate IS NULL
    

    Lumagate.NotificationEndpoint.DataWarehouse.xml

    Moving SLOs from one environment to another? (Part 1)

    June 18, 2014 Posted by Anders Asp

    Service Manager is built around storing your configuration in Management Packs. This is a great solution when you’re working with several different environments and would like to move your configuration between these, such as a test and a production environment. Most of the configuration you do is stored in different Management Packs, while data is stored in the database.

    With this in mind, let’s take a closer look at how Service Level Objectives, SLOs, are constructed.

    ConstructionofSLOs

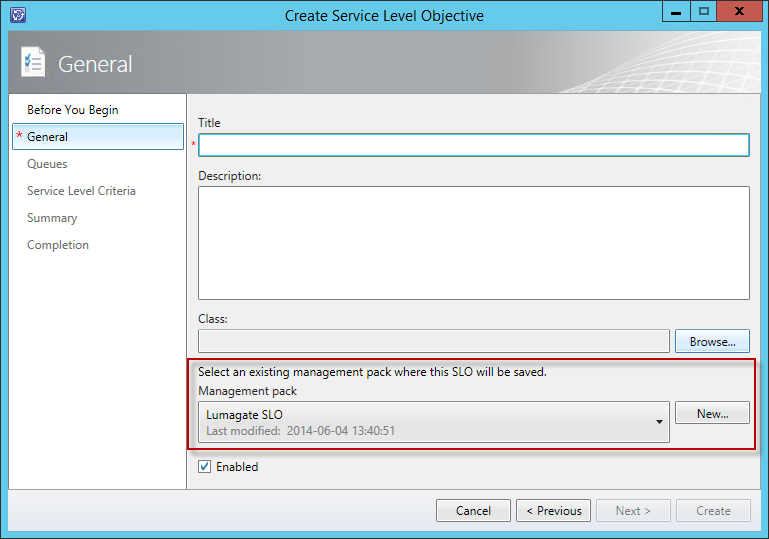
    As the picture above displays, the SLO itself is constructed of a Calendar, a Metric, a Queue and a specified Target Time. When creating a new Calendar or Metric, these will not be stored in a MP, instead they will only be created in the database. However, when you are creating the SLO itself, you are able to specify a MP to store it in, so the SLO itself should be stored in a MP, shouldn’t it? Unfortunately not!

    New SLO

    So what is really stored in the Mangement Pack specified if not the SLO itself?

    – SLO workflow group
    – SLO workflow target
    – SLO workflow: AddRelationship
    – SLO workflow: DeleteRelationship
    – SLO workflow: EndEvent
    – SLO workflow: StartEvent
    – SLO workflow: PauseEvent (disabled by default)
    – SLO workflow: ResumeEvent (disabled by default)

    In other words, parts of the SLO configuration and how it is calculated is stored in the MP (yes, the SLO is based upon a set of workflows), but not the actual SLA Configuration object.

    As a result of this, we are not able to copy SLOs from one environment to another by export/import of an MP since most of the configuration regarding your SLOs is stored in the database itself. If you try to do this, you will end with a number of “ghost workflows” – not visible in the console and related to an SLO that doesn’t exist.

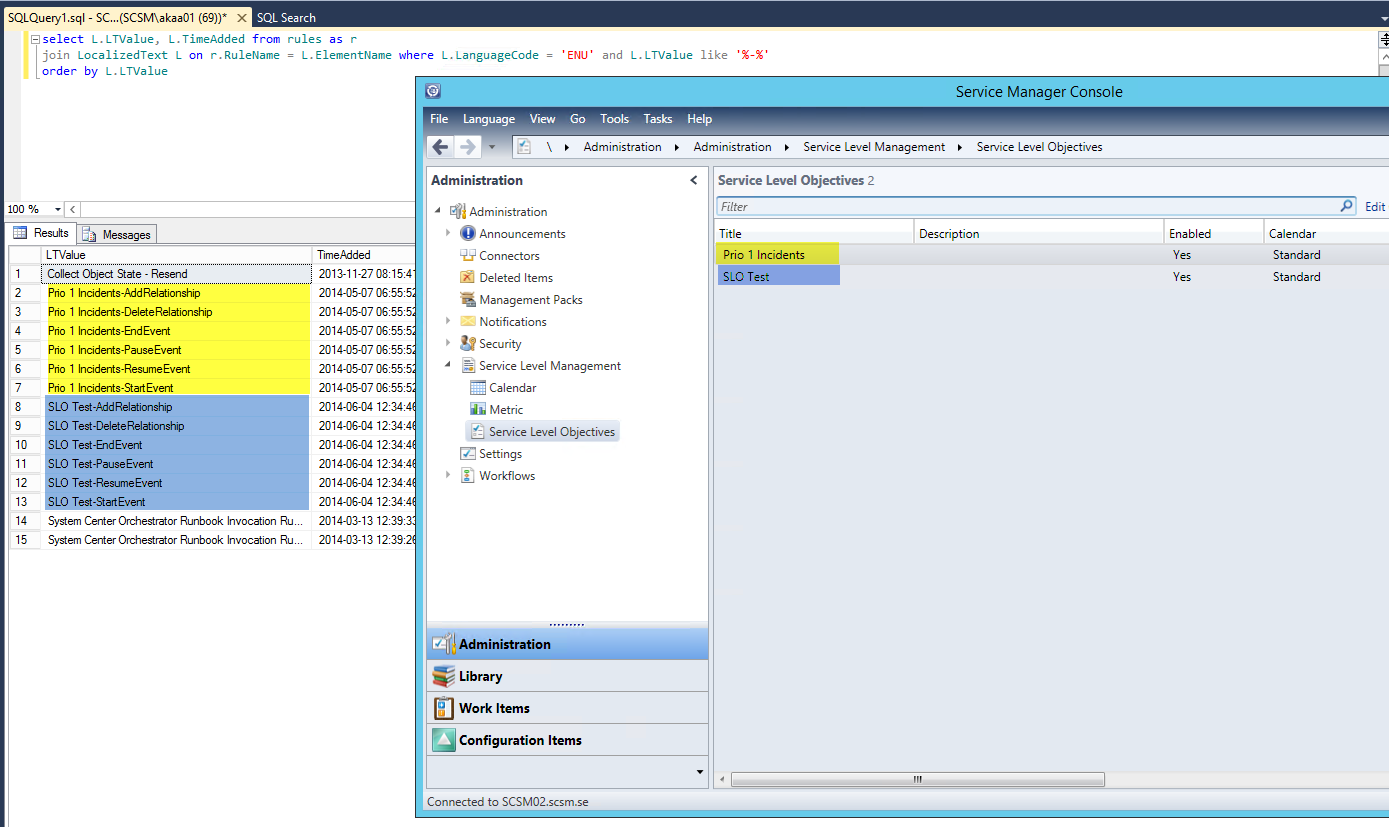
    Here’s an example of that – in this first picture, you can see my existing SLOs in the system and all the workflows following a certain pattern (that applies to SLO workflows). Note how my SLOs is matching these workflows.

    Before MP import
    BeforeSLOImport

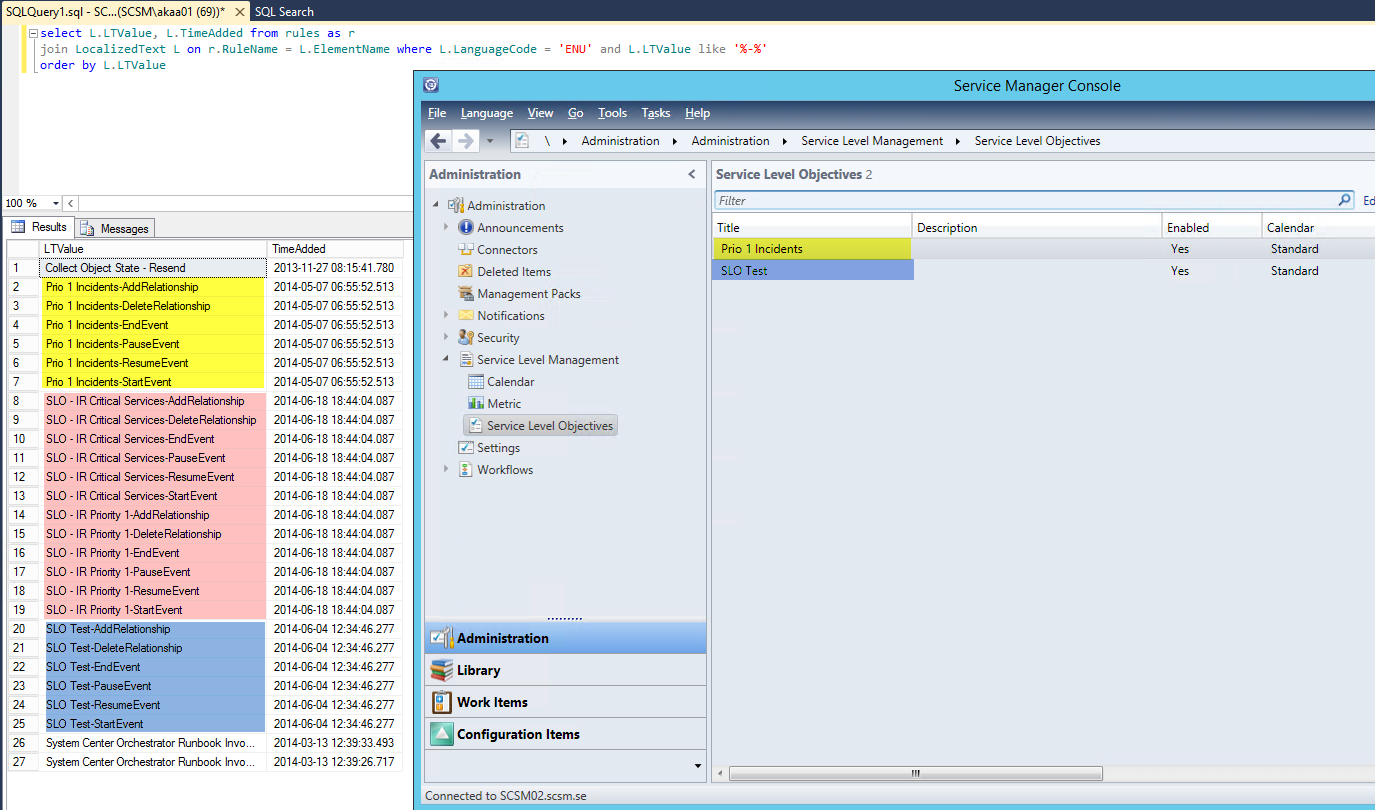
    Below is the picture displaying the exact same thing after an import of a MP containing two other SLOs. Note that these SLOs are not visible in the console and are not functional at all, yet a number of workflows has been created within Service Manager (marked with red). These are the so called “ghost workflows”.

    After MP import
    AfterSLOImport

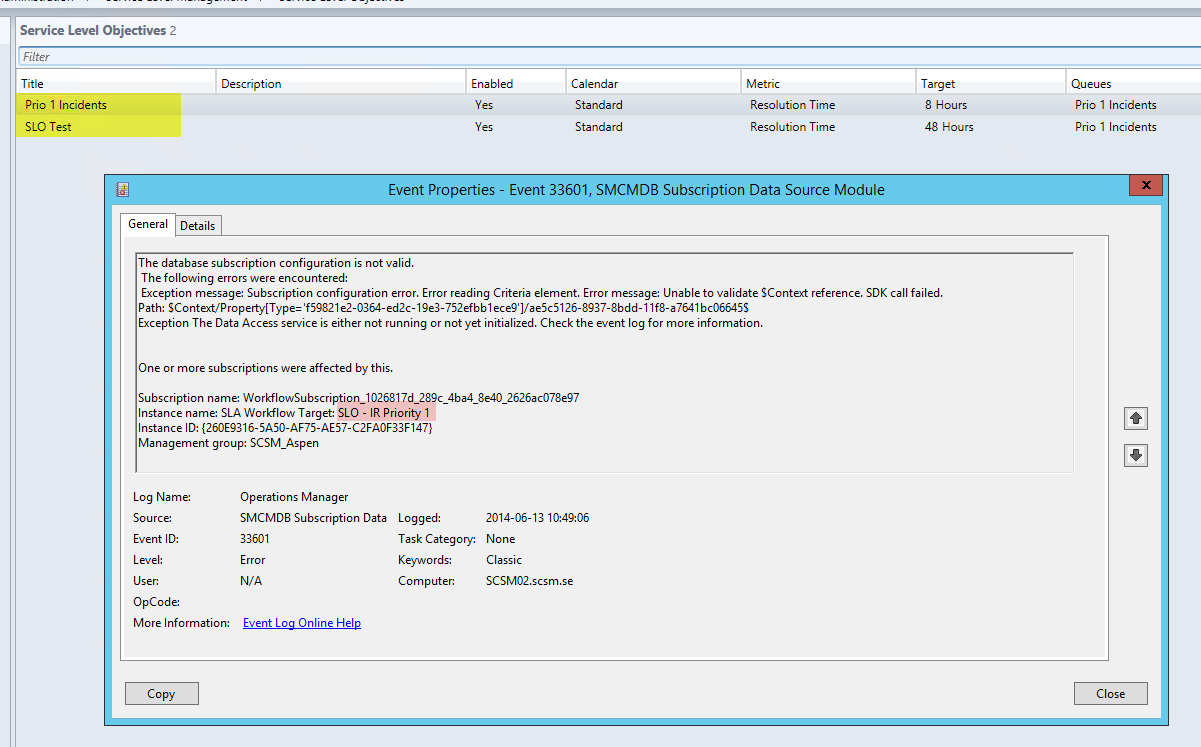
    These “ghost workflows” will not function and will throw errors in the Operations Manager event log on your Management Server, just like this:

    Event

    So to summarize: Do not try to export/import the MP containing SLOs to copy SLOs from one environment to another. Doing so will only result in a number of erroneous “ghost workflows” that might affect performance, stability and clog up your event logs with events.

    In the second part of this blogpost I will try to create a script or runbook that you can use to copy SLOs from one environment to another instead – stay tuned!

    DCIM-B308: Advanced Lessons learned from Implementing System Center 2012 R2 Service Manager

    May 13, 2014 Posted by Anders Asp

    To all of you who attended to my session at TechEd yesterday – thank you! It was a great experience and I hope you learned something that you can make use for in your Service Manager environment! Now, I promised to post all the queries and links here on the blog, so here we go.

    SQL Queries related to History:

    -- Get the BasedManagedEntityId for a particular Incident
    ------------------------------------------------------------
    select BaseManagedEntityId, Name, LastModified
    from BaseManagedEntity where Name = 'IR12740'
    
    -- Get the whole history of this object
    ------------------------------------------------------------
    select * from EntityChangeLog
    where EntityId = '2FD95F73-F940-E434-68AB-1ECDDA86D8D8' order by LastModified desc
    
    -- Get all Changes in that transaction
    ------------------------------------------------------------
    select * from EntityChangeLog
    where EntityTransactionLogId = '181762'
    
    -- When and who did the update?
    ------------------------------------------------------------
    select * from EntityTransactionLog
    where EntityTransactionLogId = '181762'
    
    -- Which properties were changed in a particular update?
    ------------------------------------------------------------
    select * from MT_System$WorkItem$Incident_Log
    where EntityChangeLogId = '825955'
    
    -- Which properties has been changed on a certian object?
    ------------------------------------------------------------
    select * from MT_System$WorkItem$Incident_Log
    where BaseManagedEntityId = '50494CAB-21D5-BFD8-7540-ADDD86D64239'
    

    SQL Queries related to changing the AD connector batch sizes:
    Remember! Changes directly to the database is NOT supported!

    
    -- To retrieve the current batch size value for AD connector
    ------------------------------------------------------------
    select DataName,DefaultBatchSize
    from lfx.datatable
    where DataName in (
    'AD_User_Out',
    'AD_UserPreference_Out',
    'v_AD_UserManager',
    'AD_UserNotificationPoint_Out',
    'AD_GroupNotificationPoint_Out',
    'AD_Computer_Out',
    'AD_Printer_Out',
    'AD_Group_Out')
    
    -- To update batch size values for AD connector
    ------------------------------------------------------------
    Update LFX.DataTable
    Set DefaultBatchSize = 1000
    where DataName in (
    'AD_User_Out',
    'AD_UserPreference_Out',
    'v_AD_UserManager',
    'AD_UserNotificationPoint_Out',
    'AD_GroupNotificationPoint_Out',
    'AD_Computer_Out',
    'AD_Printer_Out',
    'AD_Group_Out')
    
    -- To reset the batch sizes back to default values again
    ------------------------------------------------------------
    Update LFX.DataTable
    Set DefaultBatchSize = 50
    where DataName in (
    'AD_User_Out',
    'AD_UserPreference_Out',
    'v_AD_UserManager',
    'AD_UserNotificationPoint_Out',
    'AD_GroupNotificationPoint_Out',
    'AD_Group_Out')
    
    Update LFX.DataTable
    Set DefaultBatchSize = 200
    where DataName in (
    'AD_Computer_Out',
    'AD_Printer_Out')


    Useful links:

    FirstAssigned Date override (incl. MP)
    http://www.scsm.se/?p=853

    How to manually execute WorkItem Grooming in Service Manager
    http://blogs.technet.com/b/mihai/archive/2012/12/12/how-to-manually-execute-workitem-grooming-in-service-manager.aspx

    Modifying the batchsizeof AD and SCCM connector
    http://blogs.technet.com/b/mihai/archive/2013/08/14/tweaking-the-ad-and-cm-connectors-in-service-manager-2012.aspx

    Implied Permissions (incl. MP)
    http://blogs.technet.com/b/servicemanager/archive/2014/03/19/improving-ad-connector-performance.aspx


    I’ve also attached the slide deck if you would like to take a look at the slides again.

    DCIM-B308

    Some quick updates

    April 30, 2014 Posted by Anders Asp

    Wow – so much work and so little time! Sorry for the lack of updates recently!

    Here’s a couple of quick things:

    TENA

    I’ll be going to TechEd North America to present in two weeks:

    DCIM-B308  Advanced Lessons Learned from Implementing Microsoft System Center 2012 R2 Service Manager
    Monday, May 12 4:45 PM – 6:00 PM
    Speaker(s): Anders Asp
    Track: Datacenter and Infrastructure Management
    Session Type: Breakout
    Topic: System Center Service Manager
     
    After working with System Center Service Manager for five years, we’ve managed to learn quite a bit of what to do and what not to do. This session teaches you many of the DO’s and DON’Ts on the technic, architecture, organization, and process side.
     
    The session will cover different type of scenarios of all kind of complexity. There should be something useful for anyone working with Service Manager, regardless if you’re new or been working with it for a while. So please come listen to the session if you’re going to Houston!
     

    Update Rollup 2

    The first Update Rollup for Service Manager 2012 R2 has been released and it contains some really important bugfixes (which we’ve been waiting for!).

    Some of the fixes:

    – Console maximize bug has been fixed!
    This means that we can run Service Manager in full screen mode without getting any performance decrease or weird form behaviour!

    – Auto update of views
    Views that is configured for auto update will now correctly notify the analyst when items in the view has been changed. Additionally, these views will no longer throw an error when the FullUpdate occur.

    – Service Request templates crashed the console if they contained an Assigned to User

    +++ more!

    For full detail and to download the update package, go here:
    http://support.microsoft.com/kb/2904710

    I’ve already installed this at a few customers without having any issues.

    MVP Renewal

    I got renewed as an MVP for the third year in a row! I’m really grateful and thrilled about being part of the MVP program for another year! Last year were pretty chaotic on my personal side, hopefully I’ll manage to contribute even more to the community this year.

    Anders Asp MVP

    Session Recordings

    For my Swedish readers: I’ve been attending to some events lately where my sessions has been recorded. Take a look here if you’re interested (in Swedish)

    Provisionera VMs i Azure från Service Manager och Orchestrator
    http://www.youtube.com/watch?v=dr9rE55Xnxw&index=10&list=PLcHuyfrfAedUf3FXQXvz9mX9O8iTfsDOl

    Access Management with System Center and Forefront Identity Manager
    http://www.youtube.com/watch?v=GCEHDGXVhxU


    Installer crashing with error code CLR20r3 when trying to apply UR2 or UR4

    March 2, 2014 Posted by Anders Asp

    A collegue of mine just ran into this error at a customer site. He was about to upgrade a SCSM 2012 SP1 environment to 2012 R2 but had to apply UR2/UR4 first, but when he tried to run the installer, he got an application crash with this error:

    Description:
    Stopped working

    Problem signature:
    Problem Event Name:                        CLR20r3
    Problem Signature 01:                       scsm2012_amd64_patchwizard.exe
    Problem Signature 02:                       7.5.2905.158
    Problem Signature 03:                       5267ae2a
    Problem Signature 04:                       mscorlib
    Problem Signature 05:                       2.0.0.0
    Problem Signature 06:                       503ef855
    Problem Signature 07:                       34a5
    Problem Signature 08:                       1c5
    Problem Signature 09:                       System.IO.IOException
    OS Version:                                          6.1.7601.2.1.0.272.7
    Locale ID:                                             1053

    Read our privacy statement online:
    http://go.microsoft.com/fwlink/?linkid=104288&clcid=0x0409

     If the online privacy statement is not available, please read our privacy statement offline:
    C:\Windows\system32\en-US\erofflps.txt

    We tried various things to sort it out and after some unsuccessful attempts and a bit of searching the web, we found this forum thread:
    http://social.technet.microsoft.com/Forums/en-US/b4dea854-3191-4b9a-9aa1-1fbf8b37c077/system-center-service-manager-sp1-update-rollup-2-error?forum=systemcenterservicemanager

    Following the advices in the thread we eventually found a way to fix this – run Windows Update and apply the patches! As it turned out, this environment hadn’t been updated for nearly a year (!!) and after running Windows Update the installer worked as expected.

    How to add a new Knowledge Article Status

    February 26, 2014 Posted by Anders Asp

    Knowledge Management is a component within SCSM which is rarely used. This is very unfortunately since it makes so much sense having it in your ITSM system – to be able to have information nearby and easy accessible, to be able to relate the Knowledge Articles to your Work Items and so on. I do understand the reasons why Knowledge Management is under used though, and I really hope we’ll see some investments in this area from Microsoft in the near future.

    Some customers does however use Knowledge Management, and the majority (if not all) of these have asked how they would be able to add new Knowledge Article Statuses. Most of them want a new status named Internal for KAs only targeting the analysts. By default only Knowledge Articles with the Status set to Published will be visible for End Users in the Self-service Portal, so by doing this you can have internal articles only visible to IT.

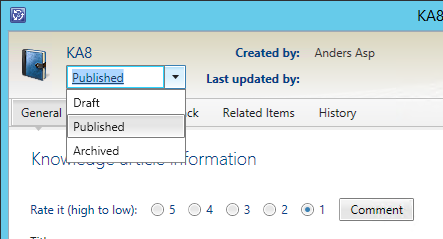
    By default there’s three different statuses, like this:

    KAStatuses

    As this is a ordinary list you would think that you would be able to edit it under Library –> Lists, but as you probably already have found out if you are reading this post, the list isn’t listed here.

    KALists

    In order to add new items to this list we have to do some XML editing. The Knowledge Article Status list is stored in a sealed MP named “System.Knowledge.Library” and since it is sealed, we have to add new list items in a new MP. So create a new MP or open an existing in which you would like to store this list item. Then add a reference to the System.Knowledge.Library MP. Just like this:

    <Reference Alias="Knowledge">
      <ID>System.Knowledge.Library</ID>
      <Version>7.5.3079.0</Version>
      <PublicKeyToken>31bf3856ad364e35</PublicKeyToken>
    </Reference>
    

    Then add the actual new list by adding the EnumerationValue tag just like below. The ID can be anything you want, in this example I’m just following the same standard as Microsoft used when they created the original list items.

    <TypeDefinitions>
      <EntityTypes>
        <EnumerationTypes>
          <EnumerationValue ID="System.Knowledge.StatusEnum.Internal" Accessibility="Public" Parent="Knowledge!System.Knowledge.StatusEnum" Ordinal="12" />
        </EnumerationTypes>
      </EntityTypes>
    </TypeDefinitions>
    

    The ordinal of the Out-of-the-box Knowledge Article Statuses are:
    Draft – Ordinal=”5″
    Published – Ordinal=”10″
    Archived – Ordinal=”15″

    So by giving my new Internal status the Ordinal 12, it will be placed in between Published and Archived.

    The last thing you need to add in the MP is the DisplayString for your new list items. Remember that you need one DisplayString for each new list item and for each language you are going to support.

    <DisplayString ElementID="System.Knowledge.StatusEnum.Internal">
      <Name>Internal</Name>
    </DisplayString>
    

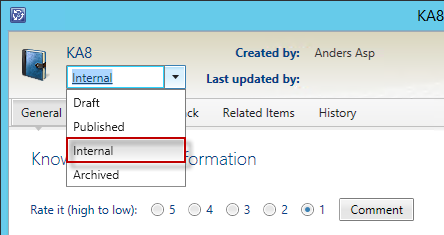
    When you’ve added all this to your MP, save it and import it into SCSM. This should result in you having a new KA Status:

    KAStatusesUpdated

    I’ve added the complete MP so you can download it and take a look at the XML code as a whole if you would like.

    Lumagate.KnowledgeArticle.Lists.zip

    The future of Service Manager

    February 18, 2014 Posted by Anders Asp

    Even though I’m pretty sure most of the readers here also reads the official Service Manager blog over at TechNet, I still think it’s worth mentioning this:
    http://blogs.technet.com/b/servicemanager/archive/2014/02/18/system-center-service-manager-a-phoenix-in-its-own-right.aspx

    It’s about Service Manager, rumors around it and the future of it. If you haven’t read it, read it now!

    I’m really excited to hear this from Microsoft and I know many of you are as well! I think it’s safe to say that Service Manager is here to stay and with the investments mentioned in the blogpost, we will see an even stronger product that will help customers with their ITSM challanges!

    Strange error message when trying to upgrade SCSM 2012 Sp1 to SCSM 2012 R2

    January 22, 2014 Posted by Anders Asp

    Today when I was helping a customer doing an upgrade of their SCSM 2012 SP1 UR2 environment to R2, we got a strange error message when trying to upgrade the Data Warehouse management server:

    “The Data Warehouse management group to which this management group is registered must be upgraded or unregistered before this management group can be upgraded”

    ErrorMessage

    The error message appear as soon as you try to initiate the upgrade by starting the Setup.exe and you don’t really get any information on what causes this. Searching the internet didn’t get me anything regarding this error at all (except one other person having the same error) so I turned to my fellow MVP colleges for some input. As it turned out, a couple of them had seen and worked their way around this issue before (thanks Christian and Steve!).

    So, to get around this issue you have to Unregister SCSM with the DW, and then do the upgrade. Once the upgrade is completed on both the DW mgmt. server and the SCSM mgmt. server, you can safely register SCSM with the DW again. All data should still be present in the database, but of course you did a backup right before the upgrade – just in case. Right?

    I don’t know what caused this error, maybe it was the fact that the customer was having a space in their management group name (I have to try that in my lab later on) cause it caused another issue when we tried to unregister SCSM with the DW. Unregistering from DW if you have a space in the management group name is not possible from the console obviously. Instead, we hade to use PowerShell to do this.

    On the DW mgmt. server, load the SCSM DW PowerShell module and then run the following commands.

    Get-SCDWSource 

    The command above will retrieve all data sources and display the information needed to run the next command.

    Unregister-SCDWSource -DataSourceTypeName <DataSourceTypeName> -DataSourceName <NameOfDataSource>

    This command will unregister the datasource from the Data Warehouse.

    If you run into this error – do you have a space in your management group name? Please drop a comment below!

    Install Data Warehouse Management unattended on a named SQL instance

    January 18, 2014 Posted by Alexander Axberg

    A bug in the installation wizard for the Service Manager setup can cause you to not be able to complete the wizard when installing the Data Warehouse Management server if you are planning on putting your databases on named instance on the SQL server (in other words, NOT the default instance).

    To get around this issue you have to do an unattenden installation from the command prompt.

    So, start by logging in to the Data Warhouse Management server with an account with all necessary permissions, fire up the command prompt (cmd.exe).

    Go to your Service Manager installation media where you can find setup.exe (for example: cd D:\amd64\)

    Type in the following commandline, and replace all text in red with your own values. This commandline is actually what the wizard produces after asking you about all settings and paths.
    Wait until the installation finishes, and then your done. Examine the SCSMInstall.log in your profile after the installation is complete to verify that everything went well, look for “return value 3”.


    Start /Wait Setup.exe /Install:Datawarehouse /AcceptEula:YES /RegisteredOwner:SCSM /RegisteredOrganization:”My Company” /ProductKey:ABCDE-ABCDE-ABCDE-ABCDE-ABCDE /CreateNewDatabase /AdminRoleGroup:DOMAIN\SCSM_Admins /StgConfigSqlServerInstance:SQL01.scsm.local\INST3 /RepositorySqlServerInstance:SQL01.scsm.local\INST3 /DataMartSqlServerInstance:SQL01.scsm.local\INST3 /ReportingServer:SQL01.scsm.local\INST3 /ReportingWebServiceURL:”http://sql01.scsm.local:80/ReportServer/ServiceRunUnderAccount:AD\svc_scsm\p@ssw0rd /DatasourceAccount:AD\svc_scsm_report\p@ssw0rd /CustomerExperienceImprovementProgram:NO /EnableErrorReporting:NO /ManagementGroupName:DW_SCSM /OMDataMartSqlServerInstance:SQL01.scsm.local\INST3 /CMDataMartSqlServerInstance:SQL01.scsm.local\INST3 /AnalysisServerInstance:SQL01.scsm.local\INST3 /ASRunUnderAccount:AD\svc_scsm_analysis\p@ssw0rd