Replace self-signed certificate in the Self-Service Portal

February 1, 2013 Posted by Alexander Axberg

This post will describe how to replace a standard self-signed certificate in the SSP portal with a certificate from a trusted source and correct defined subjectname to get rid of the certificate warnings every time your end-users access the portal.

We don’t want them to see this do we?
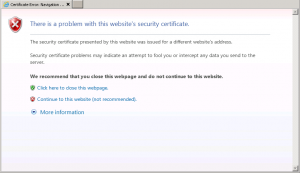
Certificate Warning

The first question you need to ask yourself is: What URL should my end-users use?

In this example we will use: https://portal.mycompany.com


The second question is: What computers will access the portal?

In most cases, the portal will only we available for internal use since it requires an AD-user to be logged on.

If it should be accessible from computers outside of the company network, you will need to buy a commercial certificate from an certificate provider that are trusted by most computers (VeriSign, DigiCert for example).

If your company has an internal Certification Authority-server and a PKI-infrastructure already in place, that would probably be the best solution to request a certificate from if only your Company computers will be accessing the portal.

(only the internal computers trust the Company CA-server)


When you are ready, you must begin with creating a certificate request. This request will contain all properties that the certificate will contain.

Open IIS Manager on the SSP server.


Select the servername in the left column, and then doubleclick Server Certificates in the right column.
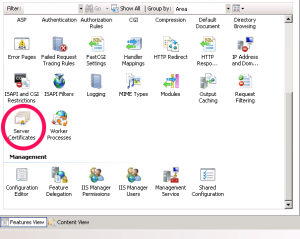
2


Click Create Certificate Request… The wizard starts.
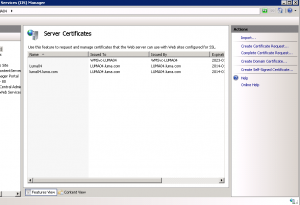
Server Certificates


Enter your company information here. The important part is Common Name, as this will reflect the domainname in your URL. If you are planning on buying a commercial certificate, it’s important that the other fields here matches your companys registered information.
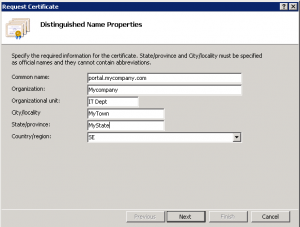
Cert details


Change the bitlength to 2048 as this is the minimum accepted size many use today.
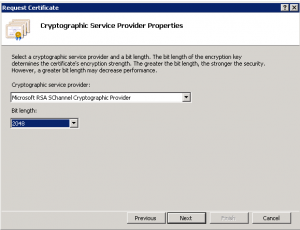
keysize


Select a location to save your certificate request to a file.
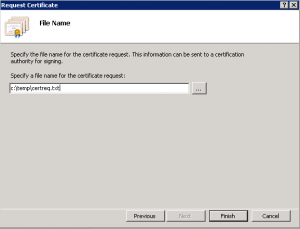
req file


You request is now saved to a file, and in the background a private key has been created on the server that will later be used in the certificate.

Now take that textfile to your certificate authority, they will use the content for producing a certificate. You will then receive a certificate with only a public key from you certificate authority. Take this file and copy it to the SSP server.

Now go back to your IIS Manger and click Complete Certificate Request…

Select the certificate file you recieved from you certificate authority and enter a friendly name. The friendly name is visible in the “Name” column in IIS Manager.

Click OK.
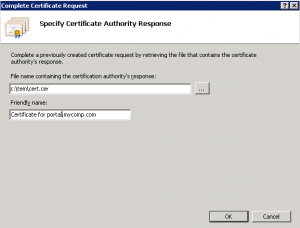
complete cert req

Now you might recieve an error message, however it’s a false alarm. If you refresh your IIS Manager you will see that the certificate has been added to the list.


Back in the IIS Manager, expand the Sites-container and select Service Manager Portal, and click Bindings.
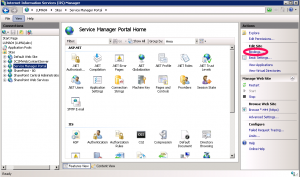
Bindings


Select the https binding and click edit.

Select the new certificate

Repeat this process the same way for the binding on the site called: SCSMWebContentServer


In IIS, double-click on Application Settings for the Service Manager Portal-site.
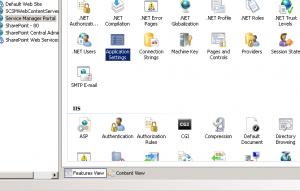
application_setting

Update the SMPortal_WebContentServer_URL value to reflect the URL in the new certificate.

Click OK, Close


Open the file: C:\inetpub\wwwroot\System Center Service Manager Portal\ContentHost\web.config, and edit the 3rd row from the bottom to reflect your new URL:

<add key=”ContentHostAbsoluteUri” value=”https://SERVER:443/ContentHost” />

Recycle the Application Pool in IIS Manager called: ContentHost_appPool to reload the edited web.config-file

This will prevent you from getting errors when opening Knowledge Articles on the portal.


..and you are all done!


Some extra information if you are curious on the certificate request process:

When the request file is created, at the same time a private key for that upcoming certificate is created. You can see it if you open up mmc.exe, add the Certificate snap-in(Computer Store) and look under the Certificate Enrollment Requests.
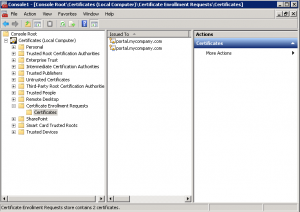
private key

Here is the private key that just been created. They will later be merged together with the public key in the .cer file you recieved when you run the “Complete Certificate Request” process.

Windows stores all it’s private keys for computerbased certificates at: C:\Users\All Users\Microsoft\Crypto\RSA\MachineKeys


My Work Items

January 27, 2013 Posted by Anders Asp

I often hear customers asking for an easier way to see all their active Work Items and if it’s possible to create a “My Work Items” view. The answer to this question is both yes and no.

Yes, it’s possible to create a “My Work Items” view, the thing is that you will not be able to filter out the closed Work Items for each class. Why? Because the Status property is not a property on the Work Item class itself, but rather a property of each and every class underneath Work Item (such as Incident, Problem, Change etc.).

For more details, please see this post including the comments written in it:
http://blogs.technet.com/b/servicemanager/archive/2010/09/28/all-work-items-assigned-to-me-view.aspx

There are some third party vendors that have observed this “issue” though and created their own solutions for this.

For instance:
http://www.cireson.com/app-store/scsm-my-work-items/
http://blog.scsmsolutions.com/2012/08/ave-pro-my-work-items-view/
http://www.caseddimensions.com/system_center_service_manager_assigned_to_me/
http://www.gridprosoftware.com/produkter/powerpack

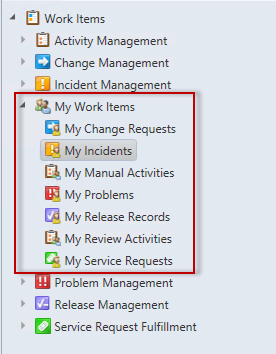
I’m sure all the solutions above works great, but the downside is that you will have to pay some money to get it. So what are the alternatives for those of us who don’t want to pay for this and are unable to develop something like this ourselves? Well, using nothing but Service Manager and Notepad, one of your best bets might look like this:

my_work_items

Now, this doesn’t give you one single view to look at, but instead of having the different “My …” views spread out through the console, I’ve gathered them all in a single place. The upside with using several views instead of one common, is that we are able to create richer views for each process. You can display very specific details for each process in the different views – something that wouldn’t work in one common view because it would be way to cluttered.

My Incidents

My Review Activities

If you want to use this approach you can download the complete MP here (updated 2013-09-20):

MyWorkItems.zip

Service Manager 2012 SP1 links

January 20, 2013 Posted by Anders Asp

Service Pack 1 for Service Manager (well, for the whole SC suite) has been available for a while and I just wanted to share some useful links with you.
(Note: CU1 for SP1 has actually been released too, but it didn’t include any fixes for SCSM)

System Center 2012 SP1 trial (incl. Service Manager)
http://technet.microsoft.com/en-US/evalcenter/hh505660.aspx

Service Manager 2012 SP1 VHDs
Mgmt. server: http://www.microsoft.com/en-us/download/details.aspx?id=36427
DW server: http://www.microsoft.com/en-us/download/details.aspx?id=36425

Service Manager 2012 SP1 Authoring Tool
http://www.microsoft.com/en-us/download/details.aspx?id=36214

Service Manager 2012 SP1 documentation
Download: http://www.microsoft.com/en-us/download/details.aspx?id=27850
Read online: http://technet.microsoft.com/en-us/library/hh305220.aspx

Orchestrator IPs for SC2012 SP1 (incl. SCSM)
http://www.microsoft.com/en-us/download/details.aspx?id=34611

And just to remind you all what’s new in SP1 for SCSM:

Chargeback

Chargeback helps you apply cloud-based pricing on Virtual Machine Manager (VMM) fabric and show that information to customers in order to minimize virtual machine oversubscription and underutilization. Chargeback illustrates how you can use System Center 2012 Service Pack 1 (SP1) in a cross-platform environment where you use multiple Service Manager components to achieve your business goals.

In Service Manager, chargeback consists of a new node in the Administration workspace, new OLAP data cubes, and sample Excel reports.

Improved Operations Manager Integration

An System Center 2012 – Operations Manager SP1 agent is automatically installed as part of Service Manager SP1. After Setup completes, you must manually configure the agent for use with the Operations Manager management server. The agent is compatible with System Center Operations Manager 2007 R2, System Center 2012 – Operations Manager, and System Center 2012 – Operations Manager SP1.

To validate that the Operations Manager Agent was installed, open Control Panel and verify that the Operations Manager Agent is present. To manually configure the Operations Manager agent, see Configuring Agents.

SQL Server 2012 Support

All databases used by Service Manager are supported on all editions of SQL Server 2012.

Windows Server 2012 and Windows 8 Support

All Service Manager roles, except the Self-Service Portal SharePoint web parts, are supported on all editions of Windows Server 2012.

Windows 8 is supported for the Service Manager console and for end-users accessing the Self-Service Portal.

To be honest we didn’t get any new cool features or functions in SP1 besides the Chargeback functionallity (which in turn is built for a very specific scenario) but underneath the shell we got many unlisted bugfixes and enhancements.

I’ve been running SP1 in my lab for a long time without any issues and some of my customers has already upgraded to SP1 – so I suggest you do the same!

Take a look at the documentation around upgrading your environment:
http://technet.microsoft.com/en-us/library/jj900193.aspx

Still got memory issues after applying UR3?

November 20, 2012 Posted by Anders Asp

A while back Update Rollup 3 for Service Manager were released and the big fix were the memory leak issue. Many companies have applied this patch and report that they didn’t notice any difference, and well… Here’s why:

In System Center 2012 Update Rollup 3, we had indicated that the console memory issues that had been reported were fixed.  Unfortunately, there was a mix up in some of the binaries that were packaged in the update rollup where the original binaries were packaged instead of the fixed binaries.  Update Rollup 3 (UR3) for System Center 2012 – Service Manager does NOT address the following memory leaks:

· Memory leak in Service Manager 2012 console when opening/closing incidents

· Service Manager 2012 console crashes with an OutOfMemoryException because of form control objects rooted in the GC heap

· Poor Service Manager 2012 console performance when opening incident forms with the console is open through Citrix

We are preparing an updated Update Rollup 3 package that will include the correct binaries that will fix the above issues.  This updated package will be released in the next few weeks and we will announce its availability here on the blog.

Please accept our apologies for the confusion/hassle.

Source (Official Service Manager blog):
http://blogs.technet.com/b/servicemanager/archive/2012/11/19/issue-with-system-center-2012-update-rollup-3-ur3-memory-leak-fix-for-scsm.aspx

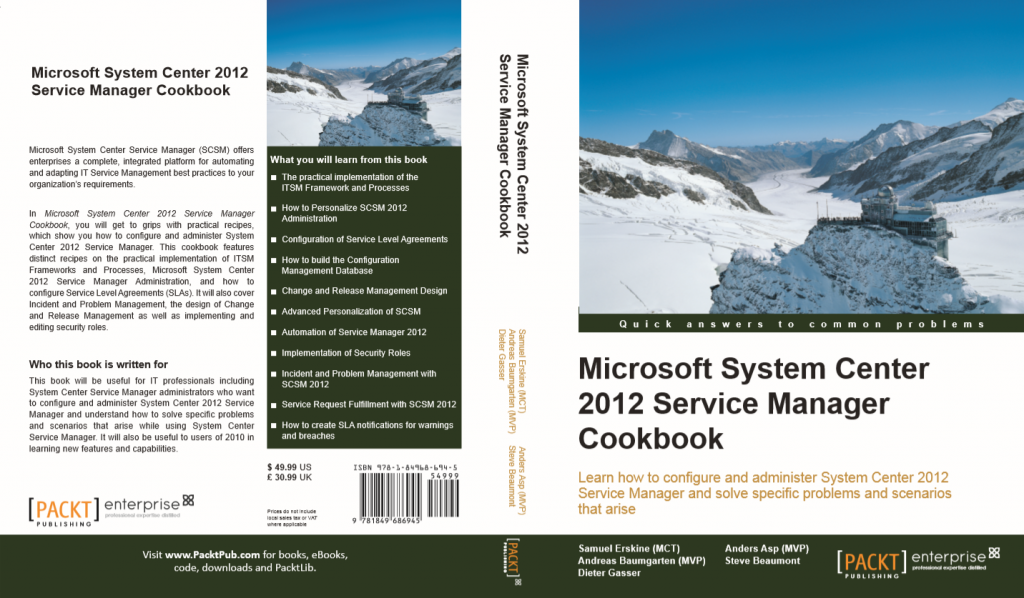
System Center 2012 Service Manager Cookbook

October 31, 2012 Posted by Anders Asp

It’s finally in the stores! 🙂

Amazon:
http://www.amazon.com/Microsoft-System-Service-Manager-Cookbook/dp/1849686947/ref=sr_1_2?ie=UTF8&qid=1351668900&sr=8-2&keywords=service+manager+cookbook

AdLibris (Swedish site):
http://www.adlibris.com/se/product.aspx?isbn=1849686947

A big thanks to Sam, Andreas, Steve and Dieter for a job well done! It was a pleasure working with you all!

Send a notification the Affected User of a Work Item when a containing Activity is updated

October 18, 2012 Posted by Anders Asp

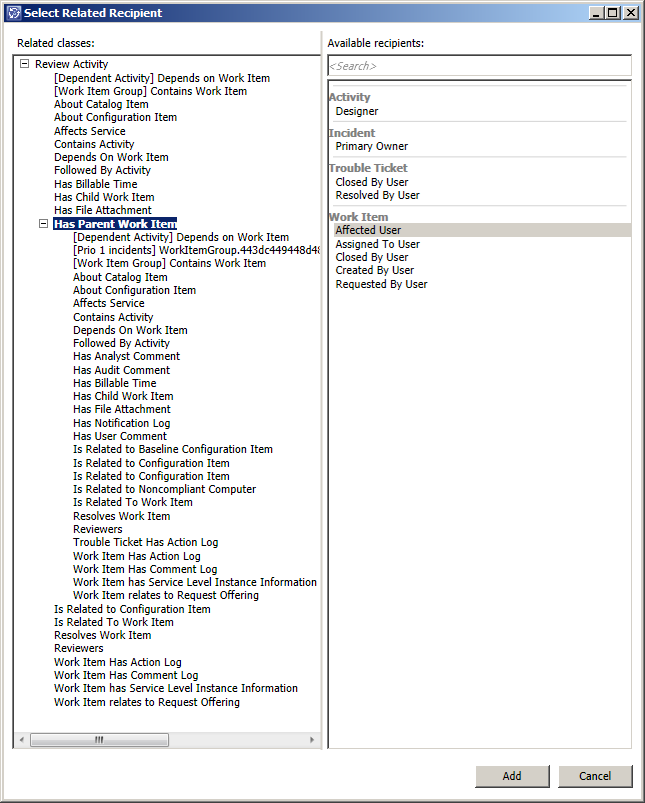
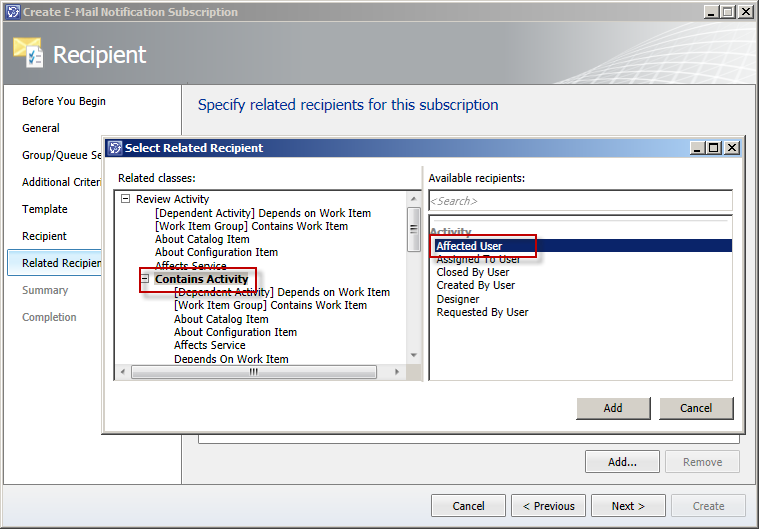
Ever tried sending a notification to Affected User of the parent Work Item of an Activity when the Activity is updated? When trying to create this subscription from the SCSM console, you are faced with this when selecting the Related Recipient:

Holy cow! You are presented with a massive ammount of relationships to choose between! I tried a couple of relationships here without any luck, and figured that it would be easier to do this in the XML code.

So let’s say we have a Service Request with a number of activities in it. When one of these activities are completed, we want to notify the Affected User of the Service Request that the particular activity is completed.

  1. Go to Administration -> Notifications -> Subscriptions and click Create Subscription task.
  2. Click Next on the “Before you being” page.
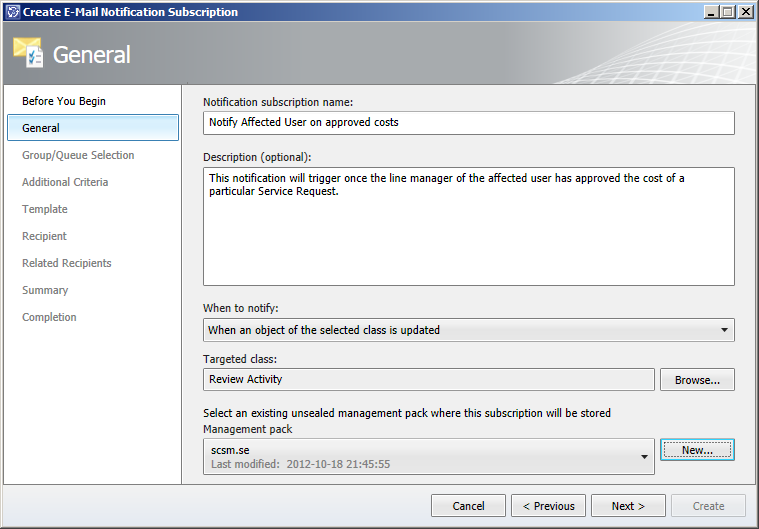
  3. Give the Subscription a Name and Description. Chose to trigger the notification whenever an object is updated and as the targeted class, use an activity class. In this example I will work with the Review Activity class. Chose a Management Pack to store this Subscription in and click Next.

  4. Click Next at the Group/Queue Selection page.
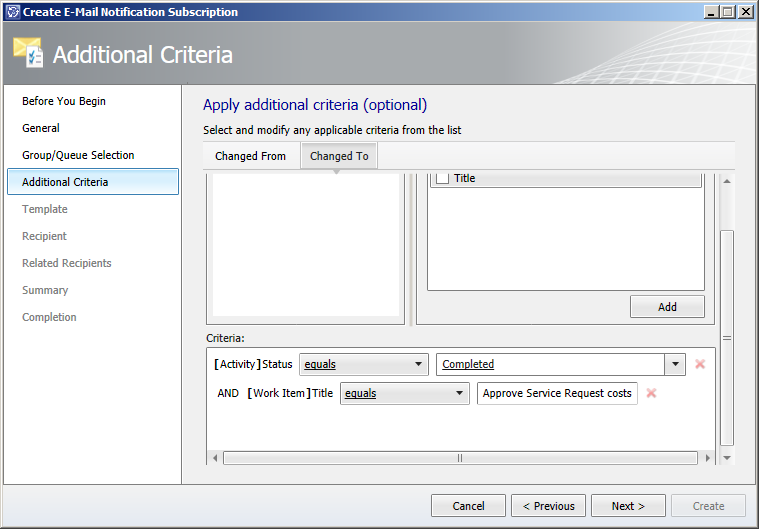
  5. In the Additional Criteria, specify whenever you want this Subscription to trigger. I will trigger whenever the status of a Review Activity with a certain title changes. Click next.

  6. Select a Notification template to use when sending the notification and click Next.
  7. Click Next at the Recipient page.
  8. Now, at the Related Recipients, click Add and select the “Contains Activity” relationship. Then select the Affected User and click Add followed by Next.


    Note: When configured this way, the Subscription will actually try to notify the Affected User of any containing activities of the Review Activity! This is what we are going to change in the XML later on.
  9. Click Create followed by Close.
  10. Now, go to Administration -> Management Packs and locate the Management Pack in which you stored this Subscription. Export it by using the Export task.
  11. Open this exported Management Pack with your favorite XML editor (I use Notepad++ but regular Notepad will do it as well).
  12. Locate the Subscription within your MP and scroll down a couple of lines to the WriteActions section. Within this section you should have a couple of lines of code that looks like this:
    <WorkflowArrayParameter Name="PrimaryUserRelationships" Type="string">
    <Item>$Context/Path[Relationship='CustomSystem_WorkItem_Activity_Library!System.WorkItemContainsActivity' TypeConstraint='CustomSystem_WorkItem_Activity_Library!System.WorkItem.Activity']/Path[Relationship='CustomSystem_WorkItem_Library!System.WorkItemAffectedUser' TypeConstraint='CustomSystem_Library!System.User']$</Item>
    </WorkflowArrayParameter>

    This is the code where we have to do some editing. We would like to reverse the Contains Acitivty relationship, so instead of looking at the Affected User of any containing acitivities of this particular Review Acitivty, we would like to select the Affected User of the Work Item in which this acivity is contained. (Hope that this make some kinde of sense?)Note: The easiest way to locate your Subscription is to search for the name you specified when it was created. This will take you to the DisplayString section where you want to copy the ElementID from the line above the subscription name. Now do a new search for this ElementID until you get to a row that starts with <Rules ID=”….

  13.  So to reverse the relationship we need to add SeedRole=’Target’ right after WorkItemContainsAcitivy relationship, like this:
    $Context/Path[Relationship='CustomSystem_WorkItem_Activity_Library!System.WorkItemContainsActivity' SeedRole='Target'
    

    Next we need to change the Work Item type we are working with. As of now it is specified as the Acitivity class, so let’s change it to the Work Item class instead.

    TypeConstraint='CustomSystem_WorkItem_Library!System.WorkItem']/Path[Relationship='CustomSystem_WorkItem_Library!System.WorkItemAffectedUser' TypeConstraint='CustomSystem_Library!System.User']$
    

    Note: Make sure you have the reference to System.WorkItem.Library specified in you MP. I’m referring to that MP with the Alias CustomSystem_WorkItem_Library because it was already present in my MP.

  14. And just to make it even more clear, here’s the code before we edited it:
    <WorkflowArrayParameter Name="PrimaryUserRelationships" Type="string">
    <Item>$Context/Path[Relationship='CustomSystem_WorkItem_Activity_Library!System.WorkItemContainsActivity' TypeConstraint='CustomSystem_WorkItem_Activity_Library!System.WorkItem.Activity']/Path[Relationship='CustomSystem_WorkItem_Library!System.WorkItemAffectedUser' TypeConstraint='CustomSystem_Library!System.User']$</Item>
    </WorkflowArrayParameter>
    

    And here’s the code after we edited it:

    <WorkflowArrayParameter Name="PrimaryUserRelationships" Type="string">
    <Item>$Context/Path[Relationship='CustomSystem_WorkItem_Activity_Library!System.WorkItemContainsActivity' SeedRole='Target' TypeConstraint='CustomSystem_WorkItem_Library!System.WorkItem']/Path[Relationship='CustomSystem_WorkItem_Library!System.WorkItemAffectedUser' TypeConstraint='CustomSystem_Library!System.User']$</Item>
    </WorkflowArrayParameter>
    

    And here it is in a picture, marked with the changes:

  15. Now save the changes and head back to the SCSM Console.
  16. Go to Administration -> Management Packs and Import the MP by using the Import task.
  17. Test your Subscription!

Please post a comment if you have any questions or if you want me to clarify anything! Oh, and by the way, if any of you managed to configure this from the console, please drop a comment as well! 😛

How to change the texts/translations on a non-English Self-service Portal

October 16, 2012 Posted by Anders Asp

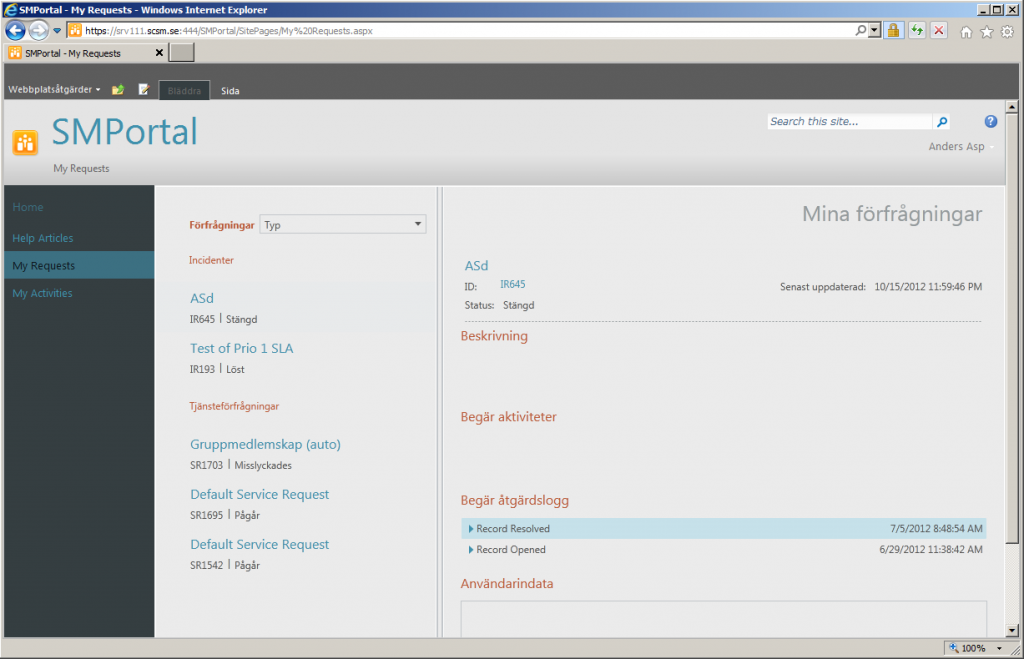
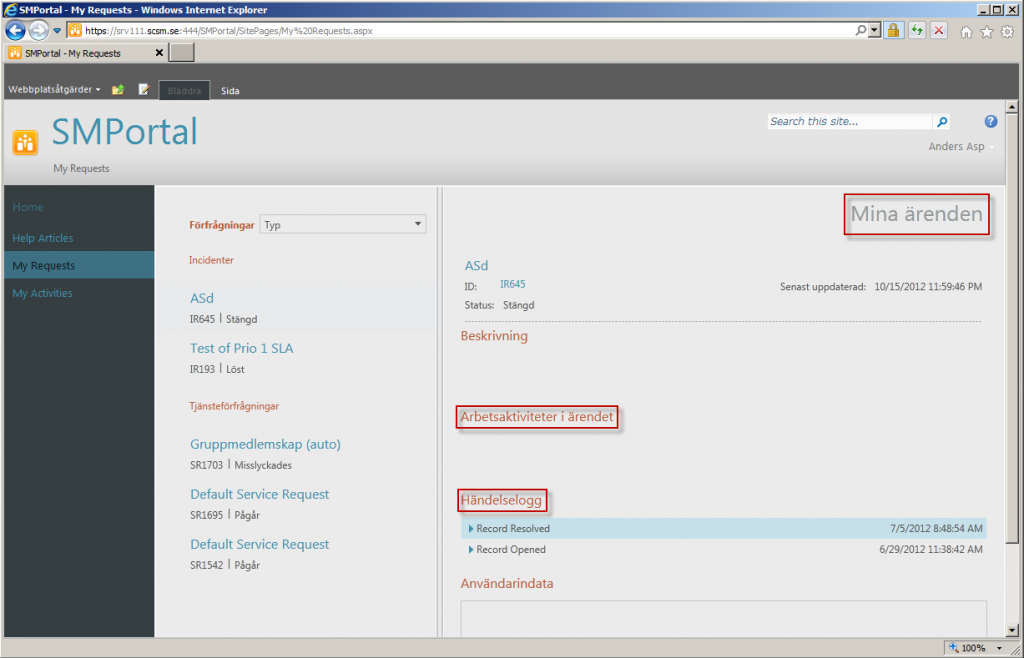
So you’ve installed Service Manager and the SSP, you’ve added the language pack for your language and you’ve enabled that language for the SSP itself – only to discover that the translations of the different texts are pretty poor. Maybe there’s nothing wrong with the actual translation, but you would like to rephrase something or add a couple of lines somewhere.

(For those of you who want’s to know how to configure the SSP to function in another language, read this blogpost: http://blogs.technet.com/b/servicemanager/archive/2012/02/14/how-to-select-the-portal-language-in-scsm-2012.aspx )

Here’s how you change the texts:

  1. Log on to your Web Content server.
  2. Go to C:\inetpub\wwwroot\System Center Service Manager Portal\ContentHost\Clientbin and locate the folder for the language which you want to edit the texts.
  3. In this folder there should be a file called SilverlightModule_StringResources.SV.resx.xml (the language code will differ depending on the directory you’ve opened).
  4. Open a text editor with admin rights (right click -> Run as administrator) and open the file. (Notepad works good for this but Notepad++ is awesome for editing these kind of files.)
  5. Locate and change the texts as you desire.
  6. Save the file.
  7. Open a browser and go to the SSP and make sure that the corrected texts is visible. (If you had the SSP opened when doing this, you need to restart your browser)

Before editing the SilverlightModule_StringResources.SV.resx.xml

After editing the SilverlightModule_StringResources.SV.resx.xml

Note: This doesn’t seem to work for the original texts written in English even though there is an English directory (C:\inetpub\wwwroot\System Center Service Manager Portal\ContentHost\Clientbin\en).

Update Rollup 3 for SCSM released

October 10, 2012 Posted by Anders Asp

Update 20/11-2012,
Please see this post: http://www.scsm.se/?p=986

In short: Memory issues seems to be resolved, yay 🙂

Here’s the complete patch notes (copied from Microsoft):

  • Memory leak in the Service Manager 2012 Console when opening/closing Incidents
  • Service Manager 2012 Console crashes with an OutOfMemoryException because of form control objects rooted in the GC heap
  • Portal: In portal if user changes sharepoint site language to Turkish, language invariant (English) language pack display strings are returned
  • Poor Service Manager 2012 Console Performance when opening Incident Forms when the Console is open through Citrix

Read more and download UR3 here:
http://www.microsoft.com/en-us/download/details.aspx?id=34960

How to add a Reviewer to a Review Activity through Orchestrator

September 20, 2012 Posted by Anders Asp

In this post we are going to take a look on how to add a reviewer to a Review Activity from Orchestrator. This is useful for occasions where you might want to add reviewers based upon the information specified in the parent Work Item. For instance, if a Change Request is related to a certain Business Service, you might want to add the owner of that Service as a reviewer for approving the actual Change Request.

I know there are some blog posts out there that describe this as a small step of the actual post, but I feel like this topic deserves a dedicated post, so here we go.

The first time you are attempting this you will probably try to do something like this:

This might seem right, but it won’t work. Why? Let’s take a look inside Service Manager to figure it out.

Here’s a picture of a Review Activity without any reviewers. This is the object that we are retrieving in the “Get Object (Review Activity)” step in the runbook above.

So let’s add a reviewer to this Review Activity by pressing Add. When doing so we are presented the following form.

This is a form for a Reviewer object – and the reason to why the runbook displayed in the beginning of the post won’t work. You see, the Reviewer object is used to store properties such as “Has veto”, “Must Vote”, “Comment”, “Voted by” etc. We are actually adding a reviewing user to the Reviewer object, not the actual Review Activity.

The relationship between all these objects goes like this:
Work Item —-> Review Activity —-> Reviewer —-> User

Let’s add the Relationship names to this as well:
Work Item — “Contains Activity” –> Review Activity — “Reviewers” –> Reviewer — “Is User”–> User

So with this knowledge, let’s head back to Orchestrator and make a new attempt to add a reviewer to our Review Activity.

In the image above you will see that we need to use another activity “Create Related Object”. This activity is used to create the Reviewer object (bear in mind that every reviewing user needs their own Reviewer object!). So first of all we need to retrieve the user which we want to add as a Reviewing user. Then we need to retrieve the Review Activity in which we want to add our Reviewing user. Now we need to create the Reviewer object and then create a relationship between the Reviewer object and the Reviewing user. This is how all this is configured:

Get Object (Reviewing User)

For simplicity I’m just retrieving a certain user – in reality you will most likely have this step much more dynamic, such as the user owning the related Business Service.

Get Object (Review Activity)

Again, for simplicity of this demo I’m retrieving a specified Review Activity.

Create Related Object (Reviewer Object)

Here’s the step where we are creating the Review Object. You are also able to specify things such as “Has Veto” or “Must Vote” in this by clicking “Select optional fields…”

Create Relationship (Reviewing User)

Finally we add the relationship between the Reviewer Object and the Reviewing User. Note that we are using the “Target Object Guid” from the “Create Related Object (Reviewer Object)” step as the Source Object Guid!

After running the runbook, this is the result:

Having trouble with your cube processing?

August 21, 2012 Posted by Anders Asp

Many people seems to have trouble getting their cube processing to work properly. Commonly, the processing works fine for a week or two after an upgrade/installation of SCSM 2012 but then suddenly fails. Different workarounds has been discussed; some people mention that increasing the ammount of RAM in the server hosting SSAS solved this issue while other have increased their RAM to as much as 48 GB without any luck. This error has been a hot topic on the Service Manager forums on TechNet and now recently on the MyITforum SCSM maillist.

Shaun Ericson at Cireson had this issue at a customer and opened a MS Support Case to get this issue investegated. Fortunately they found a solution that Shaun shared with the rest of the people on the MyITforum maillist today.

I asked Shaun if he was ok with me sharing the solution with all of you here on the blog, which he was.
Thanks for sharing Shaun!

Disclaimer: This solution was developed for a specific customer by MS Support after extensive troubleshooting. It might not apply to your environment. Use it at your own risk. If you are experiencing these issues it’s still best to contact MS Support to get it properly investigated.

Step 1 – Disable the Cube Processing jobs

On your Service Manager Data Warehouse management server, run this powershell script to disable the Cube Processing jobs:

Import-Module '%ProgramFiles%\Microsoft System Center 2012\Service Manager\Microsoft.EnterpriseManagement.Warehouse.Cmdlets.psd1'

Disable-SCDWJob "Process.SystemCenterConfigItemCube"
Disable-SCDWJob "Process.SystemCenterWorkItemsCube"
Disable-SCDWJob "ProGetcess.SystemCenterChangeAndActivityManagementCube"
Disable-SCDWJob "Process.SystemCenterServiceCatalogCube"
Disable-SCDWJob "Process.SystemCenterPowerManagementCube"
Disable-SCDWJob "Process.SystemCenterSoftwareUpdateCube"

(You might have to change the path to the Microsoft.EnterpriseManagement.Warehouse.Cmdlets.psd1 to fit your environment)

Step 2 – Manual processing of the cubes

On your SSAS server, run this powershell script:

[System.Reflection.Assembly]::LoadWithPartialName("Microsoft.AnalysisServices") > $NULL
$Server = New-Object Microsoft.AnalysisServices.Server
$Server.Connect("FQDNofServer")
$Databases = $Server.Databases
$DWASDB = $Databases["DWASDatabase"]
$Dimensions = New-Object Microsoft.AnalysisServices.Dimension
$Dimensions = $DWASDB.Dimensions
foreach ($Dimension in $Dimensions){$Dimension.Process("ProcessFull")}

Make sure to enter the FQDN of your SSAS on line 3. If using anything else than the default instance, make sure to include the instance name (FQDN\Instance)

Step 3 – Re-enable the Cube Processing jobs in SCSM

After the script in Step 2 has, run this powershell script on your Service Manager Data Warehouse management server to re-enable the Cube Processing jobs:

Import-Module '%ProgramFiles%\Microsoft System Center 2012\Service Manager\Microsoft.EnterpriseManagement.Warehouse.Cmdlets.psd1'

Enable-SCDWJob "Process.SystemCenterConfigItemCube"
Enable-SCDWJob "Process.SystemCenterWorkItemsCube"
Enable-SCDWJob "Process.SystemCenterChangeAndActivityManagementCube"
Enable-SCDWJob "Process.SystemCenterServiceCatalogCube"
Enable-SCDWJob "Process.SystemCenterPowerManagementCube"
Enable-SCDWJob "Process.SystemCenterSoftwareUpdateCube"

(You might have to change the path to the Microsoft.EnterpriseManagement.Warehouse.Cmdlets.psd1 to fit your environment)

If you are having trouble with the cube processing and tried these scripts, please drop a comment below and tell us how it worked!